Technical Diving Manual: IDU TECH-1 to TECH-3
Technical Diving
The manual for IDU technical diving programmes. Every chapter ends with a knowledge check — the next chapter unlocks only when all answers are correct.

Technical Diving
Technical diving means dives in which the diver must follow a specific sequence of procedures (techniques) to return to the surface. A dive is considered technical if it meets at least one of the following conditions:
- the dive is deeper than 40 m;
- no-decompression limits are exceeded and mandatory decompression stops are required during the ascent;
- the dive takes place in an overhead environment (caves, mines, wrecks) where a direct ascent to the surface is impossible;
- more than one gas mix is used during the same dive.
Technical diving demands knowledge, good physical fitness and a high tolerance to stress. Every technical dive must be planned in advance.
Branches of technical diving
- deep diving;
- cave diving;
- wreck diving and penetration (ships, submarines, aircraft, etc.).
Technical dives use more complex equipment configurations, and the diver must know how to use them properly. Technical dives are made on various gas mixes — Nitrox, Trimix, Heliox — on both open circuit and closed circuit (rebreathers).
Purpose, risk and the right to say no
Every technical dive needs a reason. The second rule of technical diving states:
Before any technical dive, the diver must answer three questions:
- Why am I making this dive — what is my goal?
- Do I have enough skill and experience to make this dive without exceeding a reasonable level of risk?
- Does this goal justify the risk I am taking?
Having weighed the risks and benefits, the technical diver decides whether the dive makes sense, guided by the third rule:
The principle of self-sufficiency
One of the fundamental principles of technical diver training is self-sufficiency:
Every technical diver must be able to resolve, on their own, any problem that arises during the dive.
This principle must be understood correctly. It does not mean that a technical diver should dive solo or does not need buddies. Technical diving is a team activity: coordinated teamwork is the foundation of comfortable and safe dives. Self-sufficiency means, above all, that a technical diver must not create problems for buddies and team members. Help should and will be given, but the diver's survival must not depend on it.
A good technical diver's knowledge, skills and equipment must be sufficient for diving within the limits of their certification level.
A theoretical grounding in physics and physiology is the basis for understanding what happens in the human body during decompression dives. This knowledge helps prevent serious conditions such as decompression sickness, oxygen toxicity and respiratory overpressure. Swimming and equipment-handling skills honed to the point of automatism minimise the chance of critical situations and, if something fails, allow the diver to fix it without creating new problems.
Knowledge check
8 questions
Equipment
Configuration, redundancy and selection of technical diving equipment.
Reliability and redundancy
A recreational diver who suffers an equipment failure can, as a last resort, make an emergency ascent to the surface. A technical diver goes beyond no-decompression limits or into an overhead environment, so a direct ascent is not considered a way out of an equipment failure.
Murphy's law applied to technical diving equipment reads:
If any piece of equipment can fail, it will — and at the worst possible moment.
The diver must therefore solve every problem that occurs at depth underwater. Redundancy makes this possible: every item of equipment the diver's life depends on is carried in duplicate.
What does a technical diver need to survive?
- the ability to breathe;
- the ability to control depth and position in the water;
- the ability to know the current depth and time spent there;
- the ability to see instruments and surroundings;
- the ability to free themselves from nets or lines.
Accordingly, the equipment providing these functions is duplicated:
- two independent gas sources — a twinset with an isolation manifold or two separate cylinders;
- two bottom-gas regulators — primary and back-up, each with a first and second stage;
- a dual-bladder wing, or a single-bladder wing plus a drysuit;
- two instruments — bottom timers and/or dive computers;
- two masks and, where required, at least two back-up lights;
- two cutting tools — knife, shears, line cutter.
The rest of the technical diver's kit includes fins, a stage regulator, a surface marker buoy (SMB), a reel with line and a bolt snap, and a wrist slate or wet notes with the primary and contingency dive plans. The list can be longer depending on the conditions, goals and tasks of the dive.
Be sensible when choosing your equipment and do not take dozens of kilograms of things you will not need underwater.
Your equipment must be reliable, so never skimp on scheduled servicing. Service it as the manufacturer requires, or sooner if you notice the slightest fault: the deeper you dive, the greater the risk from an equipment failure.
Streamlining and minimising snag points
A technical diver's kit must create as little drag as possible. A compact, streamlined profile is one of the key principles of configuring equipment. Nothing should hinder the diver when passing restrictions in caves or wrecks. Loose or unsecured items create a risk of snagging and entanglement. Route hoses so there are no protruding loops or loose ends. Attach additional equipment to the waist strap or harness, or stow it in pockets.
Bottom-gas cylinders
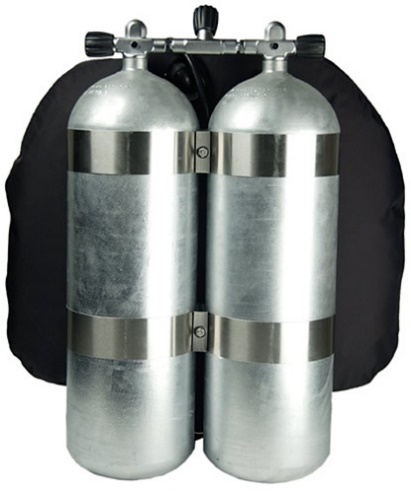
Diving cylinders differ in weight, material, buoyancy and volume. The material is easy to tell even without reading the markings: aluminium cylinders have a flat base, steel cylinders are usually rounded (some manufacturers, such as BTS and Eurocylinder, make steel cylinders with a partly concave base that can be used without a boot).
For the same volume, an aluminium cylinder is larger than a steel one and more buoyant: as the gas is used it becomes positively buoyant, whereas a steel cylinder usually stays negative. Aluminium cylinders suit warm water with minimal thermal protection. Steel is preferable with a thick wetsuit or a drysuit — the cylinder's weight offsets the suit's positive buoyancy.
The words "technical diver" usually bring to mind someone loaded with cylinders: two on the back and more on the front and sides. Yet a technical diver's job is not to carry weight, but to have enough gas for the planned dive plus an adequate reserve for the unexpected.
Technical diving uses twinned cylinders (a twinset) with an isolation manifold, or two independent cylinders mounted on the diver's sides (sidemount). To build a twinset you need two identical cylinders, a pair of cylinder bands, dedicated left and right valves and a manifold joining them into one system. Each cylinder has its own regulator. If one regulator fails or free-flows, the diver closes that cylinder's valve and switches to the working regulator, saving the gas.

Closing and opening valves in an emergency to minimise gas loss and locate the failure is one of the key survival skills. This exercise is called the valve drill (shutdown drill), and you will master it on the course.
There are two types of cylinder-to-regulator connection: DIN and Yoke (International). Technical diving uses DIN only — the threaded connection is more reliable and more compact.
The most common cylinder volumes for bottom-gas twinsets are 10, 12, 15, 16, 18 and 20 litres. Typical working pressures are 200 and 232 bar, and much less often 300 bar.
Observe the rules for cylinder testing. Hydrostatic tests are carried out at the intervals required by the law of the country where the cylinders are used, and a visual inspection is done annually. Testing may be performed only by licensed facilities. Cylinders that fail the hydrostatic test are condemned and scrapped.
Stage cylinders

Stage cylinders carry decompression (deco) and travel gases. They are carried on the side and clipped with bolt snaps to the harness D-rings, so they can easily be attached and removed both at the surface and underwater. A single stage is carried on the left: the top clip goes to the D-ring at collarbone level, the bottom clip to the D-ring on the waist strap. Several stages can be carried on both sides or all on the left, including on the lower left D-ring using an additional leash. You will practise rigging methods for different conditions with your instructor.
A stage cylinder is chosen by volume, weight and diameter. Aluminium is preferred: it is close to neutral buoyancy and disturbs the diver's trim less while swimming and on decompression stops. A stage must hold gas for all decompression stops plus a reserve. The recommended gas-management rule for decompression gases is the double-reserve principle (see the chapter "Gas Management and Planning").
Typical stage cylinders are the S40 (≈ 5.7 L) and S80 (≈ 11.1 L), with working pressures of 200 or 232 bar.
Equipment in contact with mixes containing more than 40% oxygen must be oxygen cleaned, and the cylinder must have an oxygen-compatible valve. Some countries have stricter rules (for example, cleaning for any mix above 21% O2) — always follow local regulations. Testing rules are the same for all diving cylinders.
Cylinder identification
Bottom-gas and stage cylinders must be clearly marked. A "Nitrox", "Enriched Air Nitrox" or "Oxygen" label identifies cylinders containing nitrox or oxygen. "Custom Mix" or "Trimix" marks cylinders that may contain helium. Every cylinder must carry a sticker showing the maximum operating depth (MOD), the mix, the fill date and the name or initials of the diver.
Stickers on stage cylinders are placed so that both the diver and the buddies can see the MOD during the dive.
Cylinders intended for mixes containing more than 40% oxygen are also marked "O2 Clean". Every cylinder must carry a current visual inspection sticker.
The diver personally analyses the oxygen content (and for trimix, the helium content) of every cylinder and calculates its maximum operating depth before use.
Bottom-gas regulators
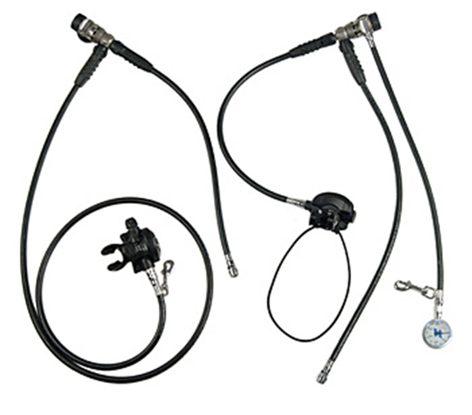
Bottom-gas regulators must meet higher demands: they are the core of your life-support system. Your comfort and safety depend on their reliability and breathing performance. Choosing one is not easy, but manufacturer information, independent tests in diving publications and your technical instructor's advice will help. A manufacturer's catalogue is only a starting point — be critical and objective. Use these principles:
- a well-known brand with a proven service record;
- a design that matches your needs (number and position of ports, swivel turret, environmental sealing, etc.);
- simple, reliable design — nothing superfluous, as every component is a potential failure point;
- availability of spare parts and service centres.
Important design features: balanced first and second stages; cold-water rating (water at depth can be much colder); enough high- and intermediate-pressure ports (HP and LP), conveniently placed for hose routing.
The classic twinset regulator configuration:
- Right post: first and second stage on the long hose (recommended length 2.0–2.1 m). With a dual-bladder wing or drysuit, an additional inflator hose.
- Left post: first and second stage on a standard-length hose, wing inflator hose, submersible pressure gauge (SPG).
There is no SPG on the right post: with the manifold open, the left-post SPG shows the pressure in both cylinders of the twinset.
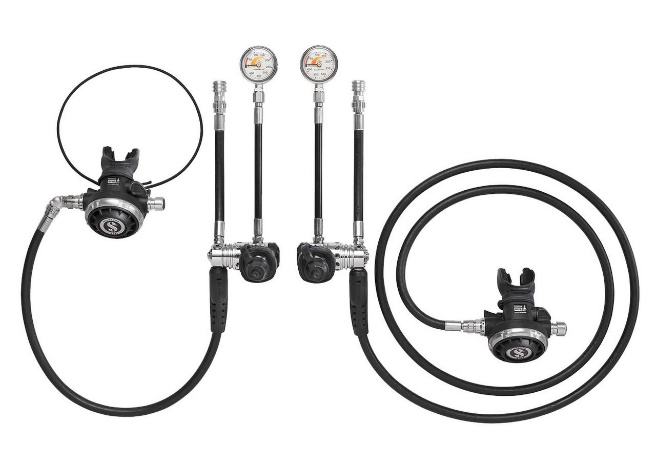
The classic configuration for two independent sidemount cylinders:
- Right cylinder: first and second stage on the long hose (2.0–2.1 m), SPG on a short hose (15–22 cm), inflator hose.
- Left cylinder: first and second stage on a standard-length hose, sidemount bladder inflator hose, SPG on a short hose (15–22 cm).
The sidemount configuration differs from the twinset: the cylinders are independent, so two SPGs are needed — one on each cylinder.
Stage regulators
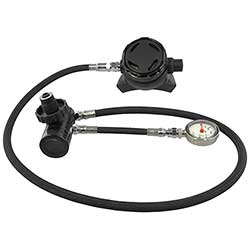
Stage regulators must meet practically the same requirements as bottom-gas regulators: reliability and easy breathing.
An additional requirement is oxygen compatibility. As you remember from the Nitrox Diver course, all equipment in contact with mixes containing more than 40% oxygen must be oxygen cleaned. There is a wide choice of such regulators. Do not use an oxygen-clean regulator on cylinders filled with air or low-oxygen nitrox from a standard compressor — this can contaminate the regulator.
The classic stage regulator configuration: first and second stage on a standard hose or a hose of about 90 cm, and an SPG on a short hose (15–22 cm).
Buoyancy control systems
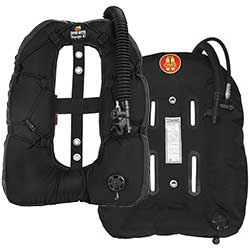
Buoyancy control systems in technical diving differ significantly from recreational ones. Recreational jackets and small single-bladder wings are not suitable for technical dives.
A technical buoyancy system for a twinset consists of:
- a backplate made of stainless steel (or aluminium, titanium, composites), bolted to the studs of the twinset bands;
- a wing-type buoyancy compensator with much more lift and a larger size than recreational wings;
- a harness (one-piece webbing) with dedicated D-rings.
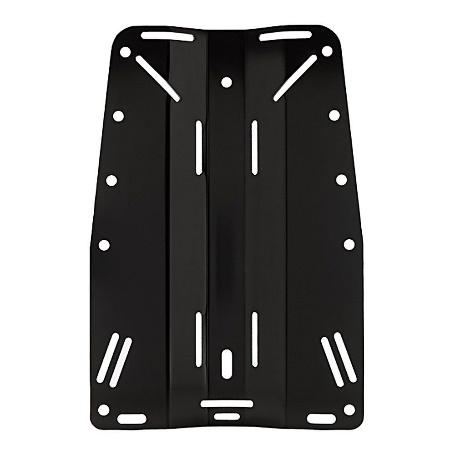
The backplate holds the twinset securely to the diver's back. Its weight and thickness depend on the goals and conditions of your diving. If you travel a lot, a light titanium or aluminium plate is more convenient. If you often dive in a drysuit close to home, a heavy steel plate helps reduce the amount of lead you carry.
Technical wings come in different shapes (horseshoe or donut), with or without bungees, with one or two bladders. The key parameter is lift. Common values: 18 kg (40 lbs), 20 kg (45 lbs), 22.5 kg (50 lbs), 27 kg (60 lbs), 36 kg (80 lbs), 45 kg (100 lbs). For warm-water dives at entry-level technical depths in a thin wetsuit with an aluminium twinset and one stage, a 40–45 lbs wing is enough. Deeper dives with heavier thermal protection, larger twinsets and several stages require wings with more lift.
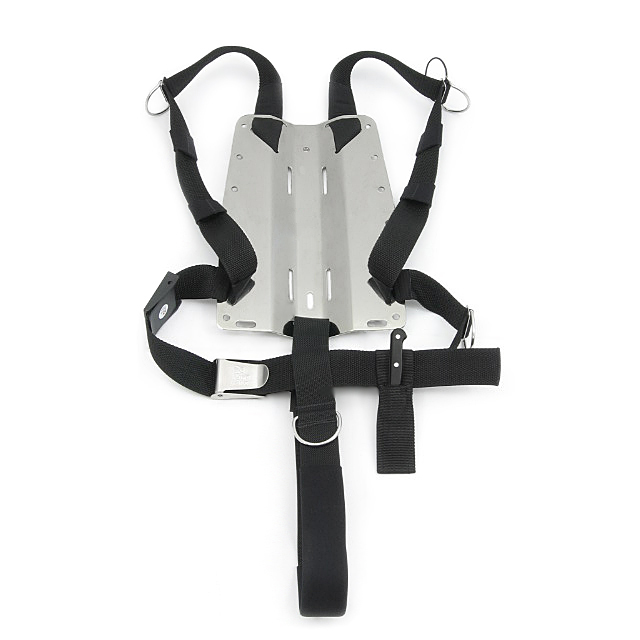
The harness attaches the whole rig to the diver, and its D-rings allow stage cylinders and other equipment to be secured. Soft shoulder and back pads add comfort without reducing functionality. The classic technical harness is the Hogarthian harness: a single continuous 50 mm webbing with five D-rings, a metal buckle, a plastic buckle to hold the light canister, and a crotch strap.
Sidemount systems are another type of technical buoyancy compensator. There are many of them on the market, with different amounts of lift. Choose the system that meets the requirements of your dives.
Dive computers and digital instruments
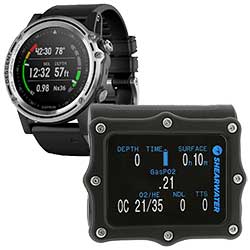
Digital instruments are needed both for training dives on the course and afterwards. The minimum requirement for technical diving instruments is to measure and display depth and dive time. Such instruments are called bottom timers. They only record current parameters and do not calculate decompression. Two instruments are the minimum requirement for technical dives.
Multi-gas dive computers are of special interest to technical divers: they calculate dives with several (up to 10) gas mixes, let you choose the algorithm and set conservatism, keep a log and dive profiles, and plan dives taking accumulated decompression obligations into account. Consult your technical instructor before buying a multi-gas computer for the course, and practise gas switching on the computer before starting decompression dives.
Thermal protection

The main purpose of thermal protection is to minimise the diver's heat loss. Hypothermia is the effect of low temperature on the whole body: peripheral blood vessels constrict and tissue nutrition is impaired. It can be caused by an unsuitable exposure suit or a long time in the water. Mild and severe hypothermia are distinguished.
Mild hypothermia — the body's thermoregulation still works. Signs: chills, shivering, calf cramps, general weakness, goose bumps, bluish skin around the mouth. Get out of the water, change into dry clothes and have a warm sweet drink.
Severe hypothermia — thermoregulation has failed: shivering stops, body temperature falls, the skin turns markedly blue, drowsiness and loss of coordination appear; further cooling leads to unconsciousness and coma. Severe hypothermia requires immediate medical help. Handle the casualty gently, keep them horizontal, insulate them from cold and wind, rewarm the trunk first (chest, armpits, groin) and do not rub the limbs.
Your suit must suit the full range of temperatures at every stage of the dive. Hypothermia:
- increases the risk of decompression sickness;
- increases inert gas narcosis;
- increases the risk of CNS oxygen toxicity;
- increases stress.
Wetsuits are suitable for technical dives in warm seas, but at depth the neoprene compresses and loses insulation precisely where the water is usually coldest. Neoprene compression also reduces buoyancy, so more gas is needed in the wing to compensate. If you choose a wetsuit for deep dives, choose a thicker model and/or a semi-dry suit.
Drysuits fully isolate the body from the water (see the Dry Suit Diver course). Technical divers often use argon for drysuit inflation: its thermal conductivity is about 1.5 times lower than air and 8.6 times lower than helium. Helium-containing mixes are never used for drysuit inflation because of helium's high thermal conductivity.
Weight systems
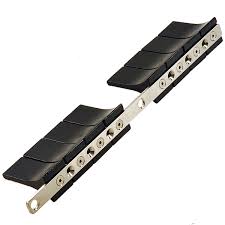
Technical divers making decompression dives prefer an integrated weight system to droppable belts or pockets. Ditching weight is not a technique used in technical diving: losing weight while carrying a decompression obligation can cause an uncontrolled ascent, serious injury and death. Weight is therefore fixed rigidly to the twinset, or a system is used that makes accidental loss impossible.
The most common option for a twinset is a V-weight, which sits between the cylinders and is held by the backplate — either bolted or simply slotted in. Weights may also be strapped directly onto the cylinders with cam bands, but this spoils streamlining, which is especially critical in caves and wrecks.
Cutting tools
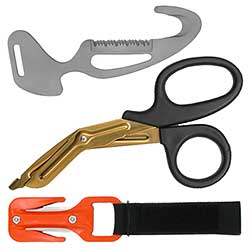
A knife, line cutter, shears and other cutting tools allow you to free yourself from entanglement. Carry them on the waist strap or shoulder strap of the harness, where they can easily be reached with either hand. Carry at least two cutting tools in different places, ideally of different types — for example a line cutter and a knife.
The choice depends on the likely hazards: line cutters handle fishing line and old guidelines, serrated knives deal with thicker ropes, shears or secateurs cut fishing nets and cables.
Spools and reels

Spools and reels are used to mark the route in an overhead environment (together with line markers that guide the diver back to the entry or exit point) and to deploy marker buoys. They are classified by line capacity and purpose: primary reels hold 60–300 m of line, spools 12–45 m.
Marker buoys and lift bags
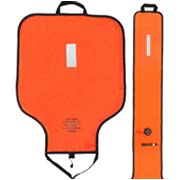
A surface marker buoy (SMB) marks the ascent point, serves as a reference on decompression stops and shows the surface team where the diver is. It is used in open water when decompression is done without visual references, and on drift technical dives. The buoy may be deployed from different depths depending on the situation.
The key rule when deploying from the bottom is to make sure there is enough line on the reel for the buoy to reach the surface. Line is paid out until the buoy reaches the surface, then reeled in during the ascent to the stop depth. Conventions differ as to which buoy colour means "all is well" and which means "problem below"; your instructor will explain the conventions used in your region.
Slates and wet notes
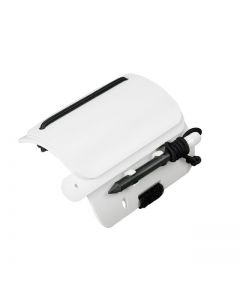
Drawing up a dive plan with all decompression stops is a mandatory part of preparation. The plan is transferred to waterproof wet notes or a slate. The entries must be easy to read and accessible at any moment of the dive. Slates and wet notes also serve for communication within the team (writing and drawing) and for recording observations.
Underwater lights: primary and back-up
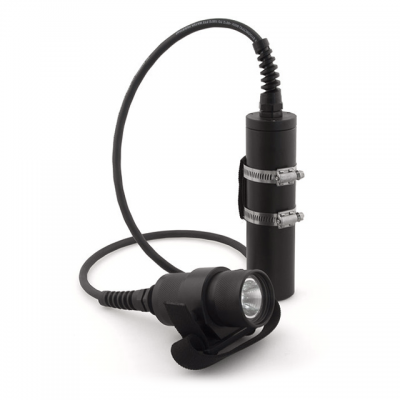
A primary light is chosen by burn time, brightness, beam focus, size, weight and ease of use. Burn time must exceed the duration of all phases of the dive, including decompression.
Lights of traditional design (handheld or pistol-grip) are awkward when both hands are needed — for example when deploying an SMB or handling stages. The solution is a Goodman handle (soft or rigid), which can be used with both handheld and canister lights.
For a long time canister lights were almost the only primary lights in technical diving. Today, thanks to advances in batteries and LEDs, self-contained lights are increasingly used.
A canister light consists of a battery canister (usually on the waist strap) and a light head with a Goodman handle, connected by a cord. This reduces the size and weight of the head, increases battery capacity and prevents the light from being lost if it slips out of the hand.
Back-up lights (their number depends on the conditions) are usually clipped to the chest D-rings and held against the harness with rubber bands so they sit close to the body. A back-up light must burn for at least the whole planned dive, with brightness and beam suited to the dive. All lights must be fully charged (or have fresh batteries) before every dive.
Equipment placement
Equipment placement is determined by accessibility and ease of use. No manual can describe the optimal configuration for every situation; this chapter covers the main types and principles of using basic technical equipment.
You have learned what equipment technical dives require, how it differs from recreational equipment and how to configure it so your dives are comfortable and safe. The most important piece of a technical diver's equipment is the head: the ability to think, analyse and make decisions.
Knowledge check
10 questions
Gases
Oxygen, nitrogen, helium, argon, carbon dioxide and carbon monoxide — properties and effects on the body.
A technical diver's breathing mixes are made up of several gases, and each of them has its own role and its own hazards. Understanding the properties of these gases is the basis for choosing and using them safely.
Oxygen
Oxygen is element 8 of the periodic table, symbol O (Latin Oxygenium). It is a chemically active element. Under normal conditions oxygen is a colourless, tasteless, odourless gas whose molecule consists of two atoms (O₂).
Oxygen is essential for producing energy in the body: in the cells it takes part in cellular respiration — the oxidation of nutrients (carbohydrates and fats) that releases energy. When the partial pressure of oxygen in the inspired gas falls, its level in the blood drops and cellular activity declines. The brain consumes about 20% of all oxygen, so a shortage first affects well-being, attention and performance. That is why medics give oxygen to seriously injured casualties.
Too much oxygen is dangerous too. Oxygen toxicity occurs when breathing pure oxygen or mixes with a raised oxygen partial pressure. Its severity depends on the partial pressure and on the exposure time. The main mechanism is oxidative stress: excess oxygen produces large amounts of reactive oxygen species (free radicals) in the tissues, which damage cell membranes, enzymes and nerve tissue. The central nervous system and the lungs are affected first.
Two forms of oxygen toxicity are distinguished: CNS (central nervous system) toxicity and whole-body (pulmonary) oxygen toxicity. Both are covered in detail in the chapter "Physiology I".
Nitrogen
Nitrogen is element 7 of the periodic table, symbol N (Latin Nitrogenium); its molecule is N₂. It is a colourless, tasteless, odourless diatomic gas and one of the most abundant elements on Earth. Antoine Lavoisier named it "azote" ("lifeless") in 1787, because it was already known that nitrogen supports neither combustion nor respiration.
Air contains about 78% nitrogen. At normal pressure nitrogen is physiologically inert — it takes no part in metabolism. But as pressure rises, so does its partial pressure and, according to Henry's law, its solubility in blood and tissues. The amount of dissolved nitrogen depends on the depth (pressure) and the time spent there. Breathing nitrogen at raised partial pressure can cause nitrogen (inert gas) narcosis and decompression sickness.
Carbon dioxide
Carbon dioxide (CO₂) is a colourless, odourless gas. Atmospheric air contains about 0.04% (≈ 420 ppm, and the figure is slowly rising). In the body, CO₂ is the end product of oxidation.
The body keeps the level of CO₂ in the blood constant. The respiratory centre in the medulla receives signals from peripheral chemoreceptors (in the carotid arteries and the aortic arch) and central chemoreceptors, and is very sensitive to rising CO₂: even a small increase of CO₂ in alveolar air (by 0.2%) almost doubles ventilation. It is the CO₂ level, not a lack of oxygen, that creates the urge to breathe.
CO₂ build-up (hypercapnia) increases narcosis and the risk of oxygen convulsions and decompression sickness — see the chapter "Physiology II".
Carbon monoxide
Carbon monoxide (CO) is a colourless, tasteless, odourless and extremely toxic gas, slightly lighter than air. It is produced by incomplete combustion of fuel and is present in engine exhaust and cigarette smoke.
For divers the main danger is contaminated cylinder gas: a faulty compressor filter, an overheated compressor or an air intake close to an engine exhaust. A concentration that is harmless at the surface becomes dangerous at depth, because the partial pressure of CO rises in proportion to the absolute pressure.
CO binds to haemoglobin about 200–250 times more strongly than oxygen. Haemoglobin bound to carbon monoxide (carboxyhaemoglobin) cannot carry oxygen, and the tissues — above all the brain — become starved of oxygen.
Helium
Helium is element 2 of the periodic table, symbol He (Latin Helium). It is an inert monatomic gas without colour, taste or odour, the second most abundant element in the Universe after hydrogen and the second lightest. Helium is extracted from natural gas by low-temperature separation.
In diving, helium is used in breathing mixes (trimix, heliox) to reduce the narcotic effect of the mix — its main advantage. Helium is also much lighter than nitrogen, so a helium mix is easier to breathe at depth. Helium has its drawbacks too.
First, helium enters and leaves tissues faster than nitrogen: its molecules are lighter and diffuse about 2.65 times faster. Helium mixes therefore require their own decompression calculations; modern algorithms (for example ZH-L16) use separate tissue half-times for helium.
Second, helium has a high thermal conductivity: a diver breathing it loses heat faster, and helium mixes are never used for drysuit inflation.
Third, helium is expensive and not available everywhere in the world.
Fourth, very deep dives bring on High Pressure Nervous Syndrome (HPNS) — a disorder of the central nervous system that appears below about 130–150 m with tremor, dizziness, nausea and loss of coordination. The faster the descent (compression), the stronger the symptoms. HPNS is reduced by adding a small amount of nitrogen (in experiments, hydrogen) to the mix and by slowing the descent, sometimes with stops. See the chapter "Physiology II".
Argon
Argon (Ar) is element 18 of the periodic table, an inert gas that makes up about 0.93% of atmospheric air. In diving, argon is used not in breathing mixes but for drysuit inflation: its low thermal conductivity and low price make it a good insulator.
As part of a breathing mix, argon has a strong narcotic effect — stronger than nitrogen, because it dissolves readily in lipids. Argon must therefore never be breathed: an argon bottle for suit inflation must be small, clearly labelled and connected only to the drysuit inflator.
Oxygen is vital but toxic at high partial pressure. Nitrogen is narcotic and responsible for decompression sickness. Helium reduces narcosis but chills the diver and needs its own decompression calculations. Argon is for drysuits only. CO₂ and CO are dangerous contaminants that must not be present in a breathing mix.
Knowledge check
8 questions
Pressure and Gas Laws
Pressure, units, and the laws of Boyle–Mariotte, Charles, Gay-Lussac, Dalton and Henry.
Most theoretical and practical aspects of diving are related to pressure in one way or another. Before we discuss the gas laws, let us define pressure and how it acts on a diver.
What is pressure
Pressure is a physical quantity equal to the ratio of a force to the area of the surface it acts on perpendicularly. When the force is evenly distributed over the surface, pressure describes the force acting on each unit of area.
P = F / S P — pressure, F — force, S — area SI unit of pressure — pascal: 1 Pa = 1 N/m²
Pressure acting on a diver
The pressure acting on a diver is the sum of two components: atmospheric pressure and water pressure (hydrostatic pressure).
Atmospheric pressure
Atmospheric pressure is the pressure of the air on all bodies within it. It exists because the atmosphere is attracted to the Earth. It was first measured experimentally in 1643 by the Italian physicist and mathematician Evangelista Torricelli.
Torricelli's experiment: a glass tube about 1 m long, sealed at one end, is filled with mercury, closed, inverted and lowered into a dish of mercury. Some mercury flows out, leaving a column of a certain height with a vacuum above it (the "Torricellian vacuum"). The weight of the mercury column balances the pressure of the atmosphere. The pressure balanced by a 760 mm column of mercury at 0 °C is called the standard (physical) atmosphere — 1 atm.
The height of the mercury column, and therefore atmospheric pressure, depends on the weather and the altitude. Near sea level, pressure falls by about 1 mmHg for every 10–12 m of altitude. This matters when diving in high-altitude lakes.
Units of pressure
| Unit | Definition and conversion |
|---|---|
| Pascal (Pa) | SI unit: the pressure of a force of 1 N evenly distributed over 1 m². 1 N is the force that gives a 1 kg mass an acceleration of 1 m/s². |
| Bar | 1 bar = 10⁵ Pa = 100,000 Pa |
| Standard atmosphere (atm) | 1 atm = 101,325 Pa = 760 mmHg ≈ 1.013 bar |
| Technical atmosphere (at) | The pressure of a 1 kgf force on 1 cm²; 1 at ≈ 0.98 bar |
| Millimetre of mercury (mmHg, torr) | 1 mmHg = 101,325 / 760 ≈ 133.3 Pa |
| Psi (pound per square inch) | 1 psi ≈ 6,895 Pa; 1 bar ≈ 14.5 psi |
In diving practice it is accurate enough to take 1 atm ≈ 1 bar ≈ 1 ATA.
Hydrostatic pressure
The pressure that a liquid at rest exerts on the bottom and walls of a container, or on a body immersed in it, is called hydrostatic pressure. It is directly proportional to the density of the liquid and the height of its column. According to Pascal's law, pressure in a liquid or gas is transmitted equally in all directions.
P = ρ · g · h ρ — density of the liquid, g — gravitational acceleration (≈ 9.81 m/s²), h — height of the column
The height of a water column whose pressure equals one atmosphere:
ρmercury · g · 0.760 m = ρwater · g · h Fresh water (ρ = 1000 kg/m³): h = 13,595 × 0.760 / 1000 ≈ 10.3 m Sea water (ρ ≈ 1030 kg/m³): h = 13,595 × 0.760 / 1030 ≈ 10.0 m
The hydrostatic pressure acting on a diver is therefore:
Phydro = depth / 10 — sea water Phydro = depth / 10.3 — fresh water
Absolute pressure
Absolute pressure (ambient pressure, ATA) is the sum of atmospheric and hydrostatic pressure:
Pabs = depth / 10 + 1 — sea water Pabs = depth / 10.3 + 1 — fresh water
When we speak of the pressure acting on a diver, we always mean absolute pressure. Most diving injuries and illnesses are related to the effects of increased pressure.
The gas laws
The state of a gas is described by four parameters: pressure (P), volume (V), mass (m) and temperature (T). The relationships between them are expressed by the gas laws — the laws of Boyle–Mariotte, Charles, Gay-Lussac, Dalton and Henry. Strictly speaking they apply to an ideal gas — a model in which molecules do not attract each other, are treated as point masses and interact only through elastic collisions. Air and breathing mixes are not ideal gases, but within the pressure range of diving these laws explain very well what happens during a dive.
Boyle–Mariotte law (pressure — volume)
The law was established by the English scientist Robert Boyle (1662) and independently by the Frenchman Edme Mariotte (1676):
For a given mass of gas at constant temperature, the product of pressure and volume is constant.
P₁ · V₁ = P₂ · V₂ = const 1 × 1 = 2 × 0.5 = 4 × 0.25
The volume of a gas decreases by the same factor as the absolute pressure increases. Boyle's law explains the loss of wetsuit buoyancy with depth, mask and drysuit squeeze, ear pressure on descent and barotrauma.
Pressure and density. Gas density (the number of molecules per unit volume) rises by the same factor as pressure. A diver's lung volume underwater stays the same, but gas is supplied at ambient pressure, so each breath brings more molecules into the lungs. Gas consumption therefore increases in proportion to absolute pressure: at 30 m (4 ATA) a diver uses gas four times faster than at the surface.
Charles's law (pressure — temperature)
For a given mass of gas at constant volume, pressure is directly proportional to absolute temperature.
P₁ / T₁ = P₂ / T₂ (m = const, V = const)
When a rigid container (a cylinder) is heated, the pressure inside rises; when it cools, the pressure falls. In calculations, pressure and temperature must be used in absolute values only.
Absolute temperature. The Kelvin scale starts at absolute zero. One kelvin is equal in size to one degree Celsius, and 0 °C corresponds to 273.15 K:
T (K) = t (°C) + 273.15 ≈ t (°C) + 273
Absolute pressure in a cylinder. A pressure gauge shows gauge pressure, so atmospheric pressure is added to its reading:
Pabs = Pgauge + 1
Example. A cylinder is filled to 210 bar at 37 °C, and the water temperature is 20 °C. What will the pressure be once the cylinder cools down in the water?
P₁ = 210 + 1 = 211 bar (abs), T₁ = 37 + 273 = 310 K, T₂ = 20 + 273 = 293 K P₂ = P₁ × T₂ / T₁ = 211 × 293 / 310 ≈ 199.4 bar (abs) Gauge reading ≈ 199.4 − 1 ≈ 198 bar
Charles's law explains why full cylinders must never be heated and why cylinder pressure drops when you dive in cold water.
Gay-Lussac's law (volume — temperature)
For a given mass of gas at constant pressure, volume is directly proportional to absolute temperature.
V₁ / T₁ = V₂ / T₂ (m = const, P = const)
If a flexible sealed container is taken from a warm room into the cold, its volume decreases while the pressure inside stays the same.
Gas mixtures. Dalton's law
A diver breathes gas supplied at ambient pressure. Air is a mixture of nitrogen, oxygen, argon, carbon dioxide, water vapour and impurities. The pressure of the mixture is the total pressure of all its gases, and each gas exerts pressure in proportion to its fraction in the mixture.
Dalton's law: the pressure of a gas mixture equals the sum of the partial pressures of the gases in the mixture.
P = pp₁ + pp₂ + pp₃ + … + ppₙ
Partial pressure is the pressure a gas from the mixture would exert if it alone occupied the whole volume of the mixture at the same temperature.
pp of a gas = (gas fraction in %) / 100 × Pabs
Examples.
Nitrogen at the surface: ppN₂ = 0.78 × 1 = 0.78 ATA Oxygen at 40 m (air): Pabs = 40/10 + 1 = 5 ATA; ppO₂ = 0.21 × 5 = 1.05 ATA
To simplify calculations, air is taken as N₂ = 79%, O₂ = 21%. Partial pressures increase with depth:
| Depth | Pabs, ATA | ppN₂, ATA | ppO₂, ATA |
|---|---|---|---|
| 0 m | 1 | 0.79 | 0.21 |
| 10 m | 2 | 1.58 | 0.42 |
| 20 m | 3 | 2.37 | 0.63 |
| 30 m | 4 | 3.16 | 0.84 |
| 40 m | 5 | 3.95 | 1.05 |
As depth increases, absolute pressure rises and with it the partial pressures of all gases in the mix. The percentage composition of the mix does not change. Every gas has threshold partial pressures above which it becomes harmful.
Solubility of gases. Henry's law
The ability of a gas to dissolve in a liquid was described by the English scientist William Henry (1803).
Henry's law: the solubility of a gas in a liquid is directly proportional to its partial pressure.
The higher the partial pressure of a gas, the more of it dissolves in a liquid. The adult human body is about 55–60% water, and as ambient pressure rises, the gases of the breathing mix dissolve more readily in blood and tissues.
Saturation, undersaturation, supersaturation
A gas dissolved in a liquid also exerts pressure — this is called the gas tension.
- Saturation (equilibrium) — the pressure of the gas above the liquid equals the gas tension in it. In a diver who has been at the surface for a long time, tissue nitrogen tension equals the partial pressure of nitrogen in air (≈ 0.79 ATA).
- Undersaturation — the pressure of the gas above the liquid is greater than the gas tension, so gas dissolves. During descent, tissue gas tensions are lower than their partial pressures in the inspired mix — tissues take up gas.
- Supersaturation — the pressure of the gas above the liquid is lower than the gas tension, so gas comes out of solution. During ascent, inert gas tension in the tissues becomes higher than ambient pressure — tissues off-gas.
Undersaturation or supersaturation persists until the gas tension in the liquid equals the pressure of the gas above it. The whole theory of decompression is based on these processes.
Absolute pressure = depth / 10 + 1 (sea water). Boyle–Mariotte: P·V = const — gas volume and gas consumption depend on pressure. Charles: P/T = const — cylinder pressure depends on temperature. Dalton: pp = fraction × Pabs. Henry: the solubility of a gas is proportional to its partial pressure.
Knowledge check
10 questions
Physiology I
Respiratory overpressure, hypoxia, hyperoxia, CNS and whole-body oxygen toxicity.
Breathing gas mixes at raised pressure means breathing denser gas. This changes the mechanics of breathing: breathing resistance and the work of breathing increase, ventilation falls during exertion, carbon dioxide (CO₂) elimination is delayed and the load on the cardiovascular system grows. The body spends extra oxygen on the work of the respiratory muscles, and under heavy exertion almost all the additional oxygen goes into breathing rather than useful work. This happens both underwater and in a "dry" hyperbaric chamber.
Barohypertension (respiratory overpressure syndrome)
Barohypertension is a pathological condition caused by breathing against excessive pressure in the airways, leading to raised vascular and intracranial pressure.
Diving equipment always adds breathing resistance: friction in the regulator valves, aerodynamic resistance of the gas, the difference in level between the regulator and the chest. Resistance increases with depth as gas density rises. The result is raised pressure in the airways.
When inhaling under raised pressure, the chest expands, the diaphragm drops, inhalation becomes easier and exhalation longer and harder. Stretched pulmonary capillaries narrow, and resistance to blood flow rises in the pulmonary circulation (from the heart to the lungs), the right ventricle and the veins. Blood supply to organs and tissues, above all the brain, is impaired.
Typical symptoms (often 3–4 hours after the dive): severe headache, sore throat, nosebleeds, throbbing in the temples, rapid pulse, a fine itchy rash on the neck and chest, haemorrhages in the whites of the eyes.
A common cause is the diver's own behaviour: trying to save gas, the diver deliberately breathes less often and holds each breath. Deep inhalation and breath-holding impede blood flow through the lungs and venous return from the head. This causes congestion in the brain's vessels, fluid leakage into tissues, a risk of oedema and haemorrhage, raised intracranial pressure and poor oxygenation of the blood.
Additional breathing resistance of about 200–250 mmHg is tolerated with difficulty; at 350–400 mmHg breathing is possible for no more than 10–15 minutes, and at 1000 mmHg acute respiratory failure develops.
Contributing factors:
- general hypothermia (vasoconstriction);
- poor physical fitness;
- heavy exertion underwater;
- "economical" breathing with long breath-holds;
- forceful straining when equalising the ears;
- incorrect regulator adjustment increasing inhalation effort;
- compression of the neck veins by an over-tight drysuit neck seal;
- stress.
First aid:
- stop diving;
- for a nosebleed — sit the casualty down with the head tilted forward, pinch the soft part of the nose firmly for 10–15 minutes and apply cold to the bridge of the nose;
- for headache — a painkiller and rest lying down;
- for severe symptoms (pale or puffy face, bluish lips, drowsiness, worsening headache, nausea and vomiting, weakness, shortness of breath, chest pain) — urgent hospital care.
Hypoxia (oxygen deficiency)
Hypoxia is a reduced oxygen level in the body or in individual organs and tissues. It occurs when there is too little oxygen in the inspired gas or the blood, or when tissues cannot use it. If hypoxia exceeds the body's ability to adapt, irreversible changes develop. The central nervous system, heart muscle, kidneys and liver are the most sensitive to oxygen shortage. Consciousness can be lost after only 8–12 seconds of acute hypoxia, and if oxygen supply is not restored, brain cells begin to die within 4–5 minutes.
Main signs: rapid, deep breathing, breathlessness, rapid heartbeat, dizziness, loss of consciousness, coma, organ failure. Important: hypoxia can develop unnoticed — people often lose consciousness without any prior discomfort.
Types of hypoxia:
- hypoxic (exogenous) — low oxygen partial pressure in the inspired gas (altitude, a hypoxic mix at shallow depth);
- respiratory — impaired transfer of oxygen from the lungs into the blood;
- anaemic — reduced oxygen-carrying capacity of the blood (anaemia, carbon monoxide poisoning);
- circulatory — circulatory failure;
- histotoxic — cells cannot use oxygen (for example in cyanide poisoning);
- overload — excessive demand by an organ (muscles during heavy work);
- mixed — any severe or prolonged hypoxia eventually acquires a tissue component.
The most realistic form for a technical diver is hypoxic hypoxia: breathing a hypoxic bottom mix at the surface or at shallow depth. On a closed-circuit rebreather (CCR) the cause may be a failed oxygen addition valve or a closed or empty oxygen cylinder. Loss of consciousness underwater leads to drowning, so on CCR the oxygen partial pressure in the loop must be monitored constantly.
Hyperoxia
Hyperoxia is a raised oxygen level in the tissues caused by breathing gas with a raised oxygen partial pressure. At first the body responds with protective reactions: breathing and pulse slow down, the vessels of the brain and retina constrict, circulating blood volume decreases — all of which limit the delivery of excess oxygen to the tissues, especially the brain. At higher doses, oxygen toxicity develops.
Factors that worsen hyperoxia:
- overheating or hypothermia;
- physical exertion;
- individual susceptibility;
- contaminants in the gas, including CO₂;
- CO₂ retention in the body.
Hyperoxia leads to two problems: CNS oxygen toxicity (the Paul Bert effect) and whole-body (pulmonary) oxygen toxicity (the Lorrain Smith effect). CNS toxicity is by far the greater danger to a diver.
CNS oxygen toxicity
The symptoms are remembered with the acronym CONVENTID:
- CONvulsions;
- Visual disturbances (including tunnel vision);
- Ears — hearing disturbances, ringing;
- Nausea;
- Twitching, especially of the face and lips;
- Irritability, anxiety;
- Dizziness.
There is no fixed order of symptoms: convulsions can start without any warning. The most dangerous event is a seizure. During it the diver has no control, the glottis closes (laryngospasm), breathing stops, and the mouthpiece is often lost or bitten through.
If the regulator is in the mouth, hold it there, control the casualty's buoyancy and start a controlled ascent once the convulsive phase is over and breathing resumes. Ascending during the seizure with a closed glottis risks lung barotrauma. If the regulator is out and cannot be replaced, start a controlled ascent immediately: the risk of drowning outweighs the risk of barotrauma.
CNS oxygen toxicity accumulates, and the rate of accumulation depends directly on the oxygen partial pressure. It is tracked as a percentage of the maximum allowable dose (CNS%).
CNS oxygen loading (NOAA tables)
| ppO₂, ATA | CNS, % per minute | ppO₂, ATA | CNS, % per minute |
|---|---|---|---|
| 0.6 | 0.14 | 1.2 | 0.48 |
| 0.7 | 0.18 | 1.3 | 0.56 |
| 0.8 | 0.22 | 1.4 | 0.67 |
| 0.9 | 0.28 | 1.5 | 0.83 |
| 1.0 | 0.33 | 1.6 | 2.22 |
| 1.1 | 0.42 | above 1.6 — not permitted | |
Recovery at the surface. When breathing air at the surface, CNS% halves approximately every 90 minutes (a half-time of 90 minutes). IDU takes a conservative approach: if the surface interval is shorter than 90 minutes, no reduction is credited in calculations.
Example: CNS is 60% after a dive. After 90 minutes at the surface it is 30%, after 180 minutes 15%.
On a rebreather (CCR) the diver spends most of the dive at a higher ppO₂ than on open circuit, which must be taken into account when planning.
Whole-body (pulmonary) oxygen toxicity
The pulmonary form of oxygen toxicity (the Lorrain Smith effect) depends on the oxygen partial pressure and exposure time and shows mainly in the lungs. The irritant effect of oxygen causes a dry throat and swelling of the nasal lining ("stuffy nose"), followed by an increasing dry cough with a burning sensation behind the breastbone. Body temperature may rise and fingertips may go numb. Once the diver stops breathing oxygen-rich gas, symptoms ease within 2–4 hours; full recovery takes 2–4 days. Prolonged breathing of oxygen at raised partial pressure affects the whole body: the number of free radicals increases and they damage cell membranes.
Symptoms:
- dry throat;
- dry cough;
- burning and discomfort in the chest;
- laboured breathing, a feeling of resistance on inhalation;
- shortness of breath.
Whole-body oxygen toxicity must also be tracked — using the NOAA limits and OTU units.
Exposure time limits at different ppO₂ (NOAA)
| ppO₂, ATA | Single exposure, min | 24-hour limit, min |
|---|---|---|
| 1.6 | 45 | 150 |
| 1.5 | 120 | 180 |
| 1.4 | 150 | 180 |
| 1.3 | 180 | 210 |
| 1.2 | 210 | 240 |
| 1.1 | 240 | 270 |
| 1.0 | 300 | 300 |
| 0.9 | 360 | 360 |
| 0.8 | 450 | 450 |
| 0.7 | 570 | 570 |
| 0.6 | 720 | 720 |
If the single-exposure limit has been exceeded, NOAA recommends a surface interval of at least 2 hours; if the 24-hour limit has been exceeded, at least 12 hours.
Whole-body oxygen loading, OTU per minute
| ppO₂ | OTU/min | ppO₂ | OTU/min |
|---|---|---|---|
| 0.55 | 0.15 | 1.10 | 1.16 |
| 0.60 | 0.26 | 1.15 | 1.24 |
| 0.65 | 0.37 | 1.20 | 1.32 |
| 0.70 | 0.47 | 1.25 | 1.40 |
| 0.75 | 0.56 | 1.30 | 1.48 |
| 0.80 | 0.65 | 1.35 | 1.55 |
| 0.85 | 0.74 | 1.40 | 1.63 |
| 0.90 | 0.83 | 1.45 | 1.70 |
| 0.95 | 0.92 | 1.50 | 1.78 |
| 1.00 | 1.00 | 1.55 | 1.85 |
| 1.05 | 1.08 | 1.60 | 1.93 |
No OTUs accumulate below a ppO₂ of 0.5 ATA. The allowable dose for a single day is no more than 850 OTU; for diving on several consecutive days the daily allowance is lower (REPEX tables).
On CCR the diver spends longer at raised ppO₂, so OTUs accumulate faster than on open circuit.
Never save gas by holding your breath — it leads to barohypertension and CO₂ retention. Hypoxia is dangerous because of sudden loss of consciousness. CNS oxygen toxicity is the main threat: convulsions can begin without warning. Track CNS% (no more than 80%) and OTU (no more than 850 per day) on every dive.
Knowledge check
10 questions
Physiology II
Inert gas narcosis, decompression sickness, HPNS, hypercapnia, hypocapnia, carbon monoxide poisoning.
Inert gas (nitrogen) narcosis
Nitrogen narcosis is a set of central nervous system disturbances that can affect divers deeper than about 30 metres. The first description of the unusual effect of compressed air dates from 1826: the Swiss scientist Jean-Daniel Colladon, after descending in a diving bell, noticed an excited state in himself resembling intoxication. Much later it was established that nitrogen at raised pressure causes effects similar to those of alcohol.
Euphoria is not the main sign of narcosis. Narcosis most often shows as slowed thinking, delayed reactions, loss of concentration and poorer motor skills. Euphoria may not appear at all: the effect can be the opposite — anxiety and fear. Reduced attention and coordination can lead to accidents, and a technical diver must be able to assess a situation quickly and correctly.
Other gases also dissolve in tissues and also have a narcotic effect. According to the rule established by H. Meyer (1899) and C. Overton (1901), a chemically inert substance that is soluble in fats (lipids) acts as a narcotic, and the higher its lipid solubility, the stronger the narcosis. Lipids are a key component of nerve-cell membranes; according to current understanding, gas dissolving in these membranes disrupts the transmission of impulses between neurons.
The lipid solubility of gases was studied using olive oil. Solubility coefficients (mL of gas per mL of oil): nitrogen 0.07, oxygen 0.11, carbon dioxide 1.34, helium 0.015. It is therefore more correct to speak of inert gas narcosis rather than nitrogen narcosis. Helium's narcotic effect is negligible. Oxygen is more lipid-soluble than nitrogen and could in theory be narcotic, but it is consumed by the body and experimental data are contradictory. IDU therefore takes a conservative approach when calculating the equivalent narcotic depth (END): oxygen is treated as being as narcotic as nitrogen (see the chapter "Gas Selection").
Carbon dioxide greatly increases narcosis. The effect was described by Case and Haldane in 1941 and tragically "rediscovered" by Edward Lanphier in 1963: while testing a cycle ergometer in a dry chamber on compressed air (about 7.8 ATA) with a breathing system that met only half his needs, marked breathlessness quickly turned into loss of consciousness. Underwater, such an incident would hardly have ended well. The lesson for divers: anything that leads to CO₂ build-up (hard work, dense gas, "economical" breathing) increases narcosis.
The degree of narcosis is hard to measure objectively: there are no precise criteria, and individual susceptibility varies greatly.
When pressure decreases (on ascent) or the diver switches to a mix with less nitrogen, narcosis quickly fades, but not instantly — its effect persists for some time.
To reduce narcosis on dives deeper than 40 metres (and in difficult conditions at shallower depths too), helium mixes are used: helium dissolves poorly in lipids and has almost no narcotic effect.
Decompression sickness (DCS)
Decompression sickness is a set of pathological effects caused by gas bubbles forming in the blood and tissues. The bubbles irritate nerve endings, disrupt circulation and mechanically damage cells. DCS occurs during decompression — moving from higher to lower pressure, i.e. during ascent, when the tension of dissolved gas in the tissues exceeds ambient pressure.
The number of bubbles depends on the difference between tissue gas tension and ambient pressure. The lungs can filter out and eliminate a certain number of microbubbles. If there are too many, they cannot be cleared, and as the diver ascends they grow and attract more dissolved gas — a "snowball" effect. Platelets and other blood cells attach to the bubbles, forming clots that increase blood viscosity and may block small vessels; vessel walls are damaged and the blood supply to organs is impaired.
The extravascular form occurs when bubbles form directly in tissues — joints, tendons, ligaments — that have a poor blood supply and release gas slowly. This form causes joint pain, the classic symptom of DCS. Growing bubbles press on nerve endings and surrounding tissues.
DCS is traditionally divided into two types:
- Type I — "pain only": pain in muscles, joints and bones, skin symptoms (itching, mottled skin). No immediate threat to life.
- Type II — neurological, pulmonary or cardiac DCS: involvement of the brain and spinal cord, the respiratory and cardiovascular systems. Life-threatening.
In the light of current knowledge this division is conditional: symptoms of both types can appear together, and Type I can progress to Type II — they are essentially manifestations of one process. Every case of DCS must therefore be taken equally seriously.
Factors that increase DCS risk
- excess body weight (more nitrogen dissolves in fat tissue and it is released more slowly);
- age;
- dehydration (including from alcohol, diuretics, heat);
- heart and vascular disease, circulatory problems;
- alcohol before or after diving;
- hypothermia, especially during decompression (blood flow and gas elimination slow down);
- heavy exertion during the dive (more nitrogen uptake) and immediately afterwards;
- flying or driving to altitude soon after diving;
- diving in high-altitude lakes;
- patent foramen ovale (see the chapter "Barotrauma and Medical Issues").
Signs and symptoms of DCS
Most symptoms appear within the first 6 hours after a dive, but they can occur up to 24 hours later (and even later after flying). Severe forms often develop quickly — within minutes to tens of minutes after surfacing.
Mild symptoms:
- altered skin sensation — tingling, pins and needles;
- skin itching;
- pink to bluish skin blotches (mottling);
- aching, dull pain in muscles, joints and bones that worsens with movement.
Moderate symptoms:
- pronounced, recurring pain in muscles and joints;
- numbness of the limbs, loss of sensation in areas of the body;
- rapid heartbeat;
- difficulty breathing;
- abdominal pain;
- brief visual and hearing disturbances.
Severe symptoms:
- weakness and paralysis, loss of consciousness, convulsions;
- breathing and heart rhythm disturbances;
- inner-ear involvement — severe vertigo, nausea, vomiting.
When giving first aid, collect information about the casualty (insurance, allergies, chronic illnesses, medication) and about the dive (depth, time, gases, whether the plan was followed), and hand it over to the medical team.
First aid for suspected DCS
- lay the casualty down horizontally: responsive — in the recovery position on the side with the head supported, or in a comfortable semi-reclining position; unresponsive but breathing — in the recovery position on the side to keep the airway open and prevent vomit from being aspirated into the lungs (vomiting is very likely with inner-ear involvement); unresponsive and not breathing — on the back for CPR. Never use a head-down position. Keep the casualty still and warm;
- the side does not matter: according to current ILCOR and DAN guidance, there is no benefit in placing the casualty on the left rather than the right side;
- give 100% oxygen as early as possible and continue until handover to medical staff;
- if the casualty is conscious and able to swallow, give non-carbonated, non-alcoholic fluids (water, isotonic drinks);
- call for help and contact DAN or the nearest hyperbaric chamber;
- question the casualty and perform a quick neurological check (the 5-minute field neurological exam), repeating it during observation;
- monitor breathing and pulse and start CPR if needed;
- transport the casualty to a medical facility with a hyperbaric chamber.
High Pressure Nervous Syndrome (HPNS)
HPNS is a disorder of the central nervous system that appears at very great depths. Recreational divers never encounter it, but technical divers increasingly make dives where it is a real issue.
Based on helium's low lipid solubility, it was calculated that helium should not cause narcosis down to about 425 m. Yet as early as 1965, during chamber dives to 180–240 m with compression rates of 6–30 m/min, the subjects were almost incapacitated — not by narcosis, but by tremor, dizziness, nausea and vomiting. Unlike narcosis, their mental abilities were largely preserved and recovered with time at depth. These were the first confirmed cases of HPNS.
In animals, further increases in pressure lead to myoclonic jerks, seizures, coma and death. Whereas inert gas narcosis depresses brain function, HPNS appears to be caused by brain excitation. The depth of onset and the severity of symptoms depend on the compression rate: the faster the descent, the shallower the onset and the more severe the symptoms.
Narcosis is associated with "swelling" of cell membranes as gas dissolves in them, HPNS with their compression by pressure itself. These effects are opposite, and that is the basis for combating HPNS.
In the early 1970s Peter Bennett proposed adding nitrogen to heliox. Adding about 5% nitrogen dramatically reduced HPNS symptoms with little narcosis. In 1981 the Atlantis IV experiment at Duke University reached 686 m: the divers had HPNS symptoms but remained able to work. The best results come from combining very slow compression (the deeper, the slower) with added nitrogen. Hydrogen was later studied instead of nitrogen: it is less narcotic and makes breathing easier at great depth, but it is explosive with oxygen and can be used only where the oxygen fraction is very low (below 4–5%). In 1992 a depth of 701 m was reached on a mix containing 49% hydrogen (hydreliox).
The exact mechanism of HPNS (like that of narcosis) is still not fully understood.
In practice this means that on very deep dives a technical diver controls the descent rate and keeps a small fraction of nitrogen in the mix.
Hypercapnia
Hypercapnia is a raised level of carbon dioxide in the blood. Normal inspired air contains only about 0.04% CO₂. At 2% CO₂ in the inspired gas a headache appears, and at 10% thinking becomes confused and consciousness may be lost, which underwater means drowning.
Causes on open circuit:
- heavy exertion underwater;
- breathing dense gas at depth (the work of breathing rises and CO₂ is cleared less effectively);
- "economical" skip-breathing and breath-holding;
- shallow, rapid breathing;
- increased dead space (for example a full-face mask);
- a regulator with high breathing resistance.
Additional causes on a rebreather (CCR): CO₂ breakthrough past the absorbent because of poor packing, exceeding the absorbent duration, faulty loop valves. The limit for inspired gas in the loop is about 0.5% CO₂ (≈ 0.005 ATA).
Symptoms: air hunger, agitation, rapid breathing, dizziness, headache, confusion, loss of consciousness.
Actions: stop working, stop moving, take several slow deep breaths and restore normal breathing. On CCR, switch to open circuit (bailout) immediately, then begin a controlled ascent completing all mandatory stops.
Hypocapnia
Hypocapnia is a reduced level of carbon dioxide in the blood, most often caused by excessively fast and deep breathing (hyperventilation). Excessive CO₂ elimination disturbs the acid–base balance (respiratory alkalosis) and causes constriction of cerebral vessels, dizziness, tingling in the fingers and muscle cramps. In addition, with low CO₂ the urge to breathe is delayed: after hyperventilation and breath-holding, oxygen can fall below a critical level before the urge to breathe appears — and the person loses consciousness.
Carbon monoxide poisoning
Signs: in mild cases — weakness, dizziness, headache, ringing in the ears, throbbing temples, flickering vision, palpitations, sometimes nausea. In moderate cases these symptoms intensify. In severe cases — loss of consciousness and breathing problems. The classic "cherry-red" skin colour is rare and should not be relied on.
First aid:
- end the dive and get the casualty into fresh air;
- give 100% oxygen as early as possible: it speeds up the removal of carbon monoxide from the blood about 4–5 times (the carboxyhaemoglobin half-life falls from 4–5 hours to 1–1.5 hours);
- transport urgently to a medical facility; severe poisoning is treated with hyperbaric oxygen in a chamber.
Carbon monoxide poisoning is life-threatening and can be fatal without qualified medical care.
Prevention: fill cylinders only at reputable dive centres and certified filling stations, and make sure the compressor is in good order and correctly installed (air intake away from exhausts). Avoid smoking for 10–12 hours before diving: smoking raises the level of carboxyhaemoglobin in the blood.
Inert gas narcosis depends on the lipid solubility of gases and gets worse with CO₂ build-up — helium reduces narcosis. DCS requires immediate first aid: lying flat, 100% oxygen, fluids, a hyperbaric chamber. HPNS is a problem of very great depths and fast descents. Hypercapnia and hypocapnia disrupt the control of breathing. Carbon monoxide calls for oxygen and urgent medical care.
Knowledge check
10 questions
Barotrauma and Medical Issues
Barotrauma, patent foramen ovale, diabetes and technical diving.
How the body responds to pressure change
The human body is mostly water, so its tissues are practically incompressible. During a dive, pressure changes are felt only in air spaces: the lungs, the middle ear, the sinuses, and also the mask and the space inside a drysuit. The volume of gas in these spaces changes according to Boyle's law.
Barotrauma and squeezes
Barotrauma is tissue injury caused by a difference between external pressure and the pressure inside an air space. The most dangerous depths for barotrauma are 0 to 10 m, both on descent and on ascent. This is where the relative pressure change is greatest: over the first 10 metres pressure doubles (from 1 to 2 ATA), while from 10 to 20 m it increases only 1.5 times (from 2 to 3 ATA), and the relative changes keep getting smaller with depth.
Lung barotrauma
Lung barotrauma is damage to or rupture of lung tissue by expanding gas. When the tissue ruptures, gas from the alveoli enters the lung tissue, the bloodstream, the pleural cavity, the mediastinum and the tissues under the skin. Causes: breath-holding during ascent, blocked airways (diving with bronchitis or pneumonia) and ascending too fast.
Forms of lung barotrauma:
Arterial gas embolism (AGE)
Gas bubbles pass through damaged lung vessels into the arterial blood and are carried to the vessels of the brain and heart. Symptoms usually appear very quickly — within minutes of surfacing.
- severe chest pain;
- weakness, dizziness;
- shortness of breath;
- bluish face;
- slurred speech, visual disturbances, paralysis — signs resembling a stroke;
- frequent loss of consciousness;
- rapid shallow breathing, coughing, frothy blood-stained sputum.
Pneumothorax
Air collects in the pleural cavity after the lung tissue ruptures, impairing breathing and circulation.
- sharp chest pain on the side of the rupture, radiating to the shoulder blade, shoulder or abdomen;
- increasing breathlessness, difficulty breathing;
- cold sweat, sometimes a dry cough;
- the casualty adopts a forced semi-sitting position;
- rapidly increasing blueness of the face;
- rapid shallow breathing, very fast heartbeat;
- signs of shock.
Mediastinal and subcutaneous emphysema
Gas in the tissues of the mediastinum and under the skin of the chest, above the collarbones, in the neck and face.
- with a small amount of gas the casualty feels fairly well; the condition worsens as gas accumulates;
- pain and discomfort in the chest;
- difficulty breathing, rapid pulse;
- change of voice, change in the shape of the neck and face;
- a characteristic crackling (crepitus) when the skin is pressed;
- sudden deterioration when the mediastinal organs and large veins are compressed.
The signs depend on where the gas has collected and may occur together. Whatever the form, lung barotrauma is a serious condition and help is needed as quickly as possible.
First aid for lung barotrauma
- keep the casualty completely at rest;
- give 100% oxygen as early as possible;
- positioning: responsive — on the side (recovery position) or semi-reclining (with a pneumothorax the casualty is usually more comfortable semi-sitting); unresponsive but breathing — on the side; not breathing — on the back for CPR. A head-down, legs-up position is not used — it does not reduce the risk of embolism and may increase cerebral oedema;
- be ready to perform CPR;
- transport to a medical facility with a hyperbaric chamber as quickly as possible.
Middle-ear barotrauma
Ear barotrauma most often occurs during descent. Rising water pressure on the outer surface of the eardrum is not balanced by the pressure in the middle ear, and the eardrum bulges inwards. The greater the pressure difference, the greater the damage. During ascent, expanding air normally escapes freely through the Eustachian tube.
Mild: a blocked feeling, pressure on the eardrum, slight hearing loss. Usually passes within a few hours.
Moderate: sharp ear pain (may last 1–2 days), noticeable hearing loss, ringing in the ear.
Severe — ruptured eardrum: the sharp pain briefly subsides and blood appears in the ear canal. Cold water entering the middle ear can cause severe vertigo and disorientation underwater.
First aid:
- stop diving;
- keep the ear dry; do not put drops or anything else into the ear and do not rinse it;
- do not blow the nose forcefully — this can carry infection from the nasopharynx into the middle ear;
- for pain — a painkiller (paracetamol, ibuprofen);
- see an ear, nose and throat (ENT) doctor — always if a ruptured eardrum is suspected.
Inner-ear barotrauma
Inner-ear barotrauma — rupture of the round (or oval) window membrane — can result from overly forceful Valsalva equalisation or a fast descent without equalising.
Symptoms: severe vertigo, nausea and vomiting, ringing in the ears, loss of balance, hearing loss, heavy sweating, pallor.
First aid: lay the casualty down, avoid any straining and seek medical help urgently. Inner-ear barotrauma resembles inner-ear DCS, so whenever in doubt, give oxygen and consult a diving medicine specialist.
Colds and allergies
Swelling of the mucous membranes during a cold or allergy can block the Eustachian tubes so that middle-ear pressure cannot be equalised. Even if the tubes are open, equalising may push mucus from the nasopharynx into the middle ear and cause inflammation.
Reverse block
To avoid missing dives because of a runny nose, divers sometimes use decongestants. Their effect can wear off during the dive — the swelling returns and the Eustachian tube closes again. Expanding air then cannot leave the middle ear during ascent, the eardrum bulges outwards, sharp pain appears and barotrauma is possible. This is called a reverse block. It can be eased by slowing or briefly stopping the ascent and descending a couple of metres, but decompression obligations and gas supply limit the options — which is why you do not dive with a cold.
Sinus barotrauma
Pressure in the sinuses normally equalises automatically when you equalise your ears, because the sinuses connect to the nasal cavity through narrow channels. During a cold or allergy these channels swell and equalisation becomes impossible. The sinuses are "squeezed", and pressure is balanced by fluid and blood seeping from the tissues.
Symptoms: sharp pain in the forehead, cheekbones or around the eyes, severe headache, sometimes pain in the upper teeth. On ascent, expanding air pushes blood from the sinuses into the nose — the diver surfaces with blood in the mask.
First aid: end the dive. Sinus barotrauma usually resolves on its own; see a doctor if the pain does not subside or gets worse, or if a fever develops.
Dental barotrauma
Occurs on descent or ascent if a tooth has a cavity (decay, a poorly fitting filling). The symptom is tooth pain that may radiate to the maxillary sinuses. It is more a reason to visit a dentist than a serious injury.
Gastrointestinal barotrauma
Rare, and related to excess gas in the intestines (for example after fizzy drinks or swallowed air). The symptom is discomfort and bloating during ascent as the gas expands.
Mask squeeze
The space inside the mask is an artificial air space. A squeeze occurs on a fast descent if the diver does not equalise it by exhaling through the nose into the mask.
Symptoms: when mild — redness along the mask outline; when severe — eye pain, haemorrhages in the whites of the eyes, bruising around the eyes.
First aid: for pain — a painkiller (paracetamol, ibuprofen). Medical care is usually not needed and the effects pass on their own, although not immediately. In severe cases an eye examination is recommended.
Drysuit squeeze
Gas must be added to a drysuit in good time. Otherwise, as pressure increases, the suit squeezes the body hard, restricting movement and breathing, and bruises may appear where the suit folds.
Carotid sinus reflex
An over-tight drysuit neck seal or a tight wetsuit hood can press on the carotid sinus — the widening of the carotid artery where it divides into the external and internal branches. The sinus contains pressure receptors; when they are stimulated, blood vessels reflexively dilate, blood pressure falls and the heart rate slows. The brain receives less blood and consciousness may be lost.
Symptoms: general discomfort, dizziness, loss of consciousness. Prevention: a correctly sized neck seal.
Patent foramen ovale and technical diving
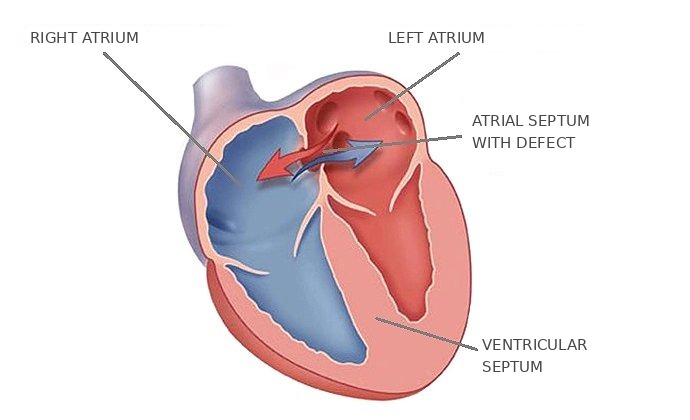
The foramen ovale is an opening in the septum between the right and left atria. Everyone has it before birth: the foetal blood bypasses the non-functioning lungs. It usually closes soon after birth, but in about 25–30% of adults it remains partly open. This is called a patent foramen ovale (PFO). A standard heart ultrasound does not always detect it; a bubble-contrast echocardiogram (bubble test) combined with a Valsalva manoeuvre is used.
What does this mean for a diver? After a dive, the venous blood almost always contains gas microbubbles. Normally the blood passes through the lungs, which filter out and eliminate the bubbles. With a PFO, some venous blood carrying bubbles can pass from the right atrium straight into the left atrium and on into the arteries — bypassing the lung capillaries, where bubbles are normally trapped and eliminated. This is called paradoxical gas embolism. Straining, coughing, lifting heavy objects and equalising the ears after a dive particularly favour this. Once in the arteries, the bubbles can cause neurological, skin or inner-ear DCS. According to current evidence (Mitchell, Doolette, 2015), a right-to-left shunt through a PFO plays the leading role in inner-ear DCS on deep dives.
Decompression algorithms do not take PFO into account. A PFO increases the risk of certain forms of DCS several times, especially after dives that produce many venous bubbles — and technical divers making deep, long decompression dives usually produce more. At the same time a PFO does not make DCS inevitable: many divers with a PFO dive for years without problems.
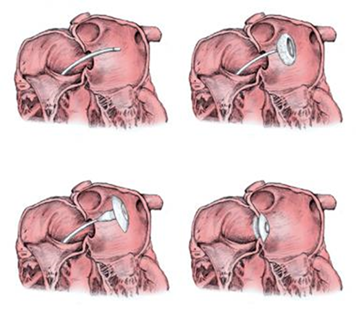
If you intend to take up technical diving, a PFO check is strongly recommended. Under IDU standards, a medical certificate confirming the absence of PFO is required for enrolment in technical courses.
If a PFO is found, the joint position statement of SPUMS and UKSDMC (2015) describes three options, chosen together with a doctor:
- stop diving;
- continue diving with conservative profiles that reduce venous bubble formation (limiting depth and time, avoiding heavy exertion and straining after the dive);
- have the PFO closed by a catheter procedure and return to diving after a follow-up examination.
Diabetes and technical diving
Diabetes is a chronic disease affecting more and more people. Diving with diabetes is possible, and DAN and UHMS have published specific guidelines (2005). However, these guidelines exclude dives requiring mandatory decompression, overhead-environment dives, long dives and dives in difficult conditions — in other words, all forms of technical diving.
The greatest danger is not high but low blood sugar (hypoglycaemia): it can cause almost instant loss of consciousness, and underwater — death.
Signs of hypoglycaemia: headache, hunger, dizziness, drowsiness, cold sweat, muscle tremor. Then loss of consciousness and convulsions, which without help lead to drowning.
Why divers are at high risk of hypoglycaemia:
- heavy exertion — technical diving demands a lot of energy;
- hypothermia — long immersion, cold water at depth;
- skipping food before a dive — too few carbohydrates in the body.
No planning, carbohydrate drink taken underwater or signals to a buddy can guarantee safety when there is a decompression obligation or an overhead environment. Technical diving is not recommended for people with diabetes.
The most dangerous depths for barotrauma are 0–10 m. Never hold your breath during ascent. For lung barotrauma — rest, 100% oxygen, correct positioning and a hyperbaric chamber. For ear injuries — nothing in the ear and a visit to an ENT doctor. A PFO increases the risk of DCS; technical divers should be checked. Technical diving is not recommended for people with diabetes.
Knowledge check
10 questions
Stress
Causes, signs and control of stress in technical diving.
Stress is a state of nervous tension. It arises when a person perceives the demands placed on them as impossible or very difficult to meet.
It is wrong to think of stress only as a reaction to trouble and strong negative emotions. Strong positive emotions — joy, triumph — can also cause stress. Its causes may be real or imagined, but the nervous tension they produce is absolutely real in both cases.
The stress response is conventionally divided into three phases:
- the alarm phase;
- the resistance (adaptation) phase;
- the exhaustion phase.
In diving we usually deal with the first phase — alarm.
Psychological and physical stress factors
Psychological factors:
- activity involving risk;
- the need to make quick decisions in a rapidly changing situation;
- the need to react instantly to danger;
- working under psychological pressure;
- lack of information about the task ahead.
Physical factors:
- very uncomfortable temperature (cold or overheating);
- seasickness;
- injury;
- poor light and visibility;
- an overhead environment, confined spaces;
- discomfort caused by unsuitable equipment;
- physical fatigue.
Signs of stress in a diver
- inability to concentrate;
- frequent mistakes, clumsiness, inability to perform routine tasks correctly;
- rapid fatigue, change of swimming pace, "freezing" in place;
- agitation, inability to calm down;
- slow communication, apathy and indifference;
- a tense, darting or frightened look;
- rapid, laboured breathing;
- constantly checking instruments.
Stress is dangerous because it makes an incident more likely, reduces the ability to self-rescue, increases the risk of losing a team member, and makes the diver's reactions inappropriate and potentially harmful to buddies.
There are two main types of response to stress:
- Avoidance — the person does not look for a solution, but tries to ignore the problem or play it down. This is dangerous because of sudden emotional breakdowns (even hysteria) after a fairly long period of apparent calm.
- Coping — the problem is recognised and analysed, advice from a buddy or rescuer is accepted, and stress moves into the adaptation phase. Such a diver usually manages on their own.
Stress in technical diving
Underwater, the response to a stressful situation can easily make the difference between a wonderful dive and a disaster. Stress left unchecked leads to panic and accidents. By the nature of their activity, technical divers are exposed to most known types of stress. Caves and wrecks remove the option of a direct ascent; darkness and the need to choose a route are all sources of stress.
The time factor
During a technical dive the diver constantly monitors the parameters on which their life depends: depth, gas supply, distance to the exit. All of them are linked to time: the deeper the diver, the longer the ascent and decompression, the more gas is needed and the greater the distance to cover. The need for constant monitoring and the awareness of the risk of running out of time are a source of stress. With experience this factor weakens but never disappears. When the plan is broken, stress rises even in very experienced divers.
Another example is not having enough time to assemble and check equipment before the dive. The wish to keep up with the group and the awareness that the equipment has not been fully checked create doubts about its reliability — and that is stress too.
A dive that starts badly usually ends even worse.
Distance from the exit is a variant of the time factor. In a cave or wreck the diver must cover a certain distance before being able to surface. Even with careful planning this weighs on the mind, although the real risk, when the rules are followed, is often overestimated. There are known cases of divers panicking for this reason and forgetting basic safety rules.
Restricted freedom of movement
Passing through restrictions, confined spaces and the impossibility of a direct ascent are obvious sources of stress. The thought of it usually sits somewhere at the back of the mind and comes to the fore when additional stressors appear.
Task loading
When there are too many tasks, or several actions must be performed at once while also being responsible to the buddies for the outcome, the diver loses mental balance and starts making mistakes, and awareness of the mistakes increases the stress. With experience and gradually increasing complexity comes confidence, but any unplanned task raises the stress level again.
Incorrect breathing
Incorrect breathing causes stress, and stress disrupts the rhythm and depth of breathing — a vicious circle. Rapid, shallow breathing leads to CO₂ build-up, air hunger and even more anxiety. Without decisive action the situation quickly becomes critical.
Disorientation
Disorientation is one of the main problems in confined spaces, in poor visibility and at great depths beyond the reach of sunlight. In caves and wrecks the diver faces a maze of passages and corridors, and the constant need to choose a route is a source of stress. On a deep dive, there is little time left to correct "navigation" errors.
Managing stress
First of all, every technical diver must learn to control their own stress level.
This is one of the best ways to stop stress turning into panic.
It is better to prevent stress than to fight it.
Regular training is the best prevention. Practising emergency procedures until they become automatic increases confidence and lowers stress underwater.
Physical fitness adds confidence, helps control breathing and lets you cope with exertion without leaving your comfort zone.
Helping a stressed buddy
- tactfully find out what is causing the stress: fear for their safety, lack of confidence, feeling unwell, or external factors (cold, poor visibility, disorientation, equipment problems);
- remove the cause if possible: calm and encourage the buddy, suggest ending the dive if necessary, or calling it off if the stress appears while still at the surface.
Attention to your buddy's state, sympathetic questions and calm advice help them recognise what is happening and find a solution themselves.
Stress is a normal reaction, but uncontrolled it leads to panic. Recognise the signs of stress in yourself and your buddy. At the first signs: stop — breathe — think — act. The best prevention is regular training, physical fitness and careful planning.
Knowledge check
8 questions
Decompression Models
Haldane, Bühlmann, VPM, Ratio Deco and Gradient Factors.
During a decompression dive a technical diver cannot surface at any moment — doing so risks decompression sickness. To avoid it, the diver makes mandatory decompression stops at various depths. The depth and duration of the stops are determined by algorithms called decompression models.
The Haldane model
The first model was created by the Scottish physiologist John Scott Haldane and published in 1908 (Boycott, Damant and Haldane). Haldane proposed a mathematical way to calculate the amount of inert gas in the tissues at each stage of a dive. According to the model, different body tissues take up inert gas at different rates. The basis is the tissue half-time for nitrogen — at the time air was the only breathing gas.
The half-time is the time it takes for the dissolved gas pressure in a tissue to change by half the difference between its starting value and the partial pressure of that gas in the inspired mix.
Example. A tissue with a 20-minute half-time; the diver breathes air at 40 m (ppN₂ = 0.79 × 5 = 3.95 ATA). Before the dive, tissue nitrogen tension is 0.79 ATA.
after 20 min: 0.79 + (3.95 − 0.79) / 2 ≈ 2.37 ATA after 40 min: 2.37 + (3.95 − 2.37) / 2 ≈ 3.16 ATA after 60 min: 3.16 + (3.95 − 3.16) / 2 ≈ 3.56 ATA
By using different half-times for "fast" and "slow" tissues, Haldane could in theory track gas uptake and elimination in different tissues and predict at what depth each tissue would reach the maximum allowable difference between tissue gas tension and ambient pressure.
From his experiments Haldane defined the maximum allowable tissue supersaturation as a 2:1 ratio (tissue ratio, TR). In other words, according to Haldane, a diver fully saturated at 10 m could ascend directly to the surface without DCS symptoms. Ascent profiles were built to bring the diver as close to the surface as possible without exceeding this ratio, followed by long stops at shallow depths. The theory did not take into account that bubbles can form even at supersaturation below the allowed limit.
Key principles of the Haldane model:
- tissues take up and release inert gas exponentially; the driving force is the difference between the gas pressure in the inspired mix and the gas tension in the tissue;
- the body contains many tissue groups with different uptake and elimination rates;
- each tissue group takes up and releases gas at the same rate;
- the whole spectrum of tissues can be approximated by a finite number of groups ("compartments").
Neo-Haldanean models. The Bühlmann algorithm
Until the 1960s Haldane's model changed only slightly (for example, the number of tissue groups increased). In the mid-1960s Robert Workman, working for the US Navy, took into account that oxygen does not contribute to bubble formation and recalculated Haldane's ratio for nitrogen only — obtaining 1.58:1. He then established that the allowable supersaturation depends on the tissue type and depth: "fast" tissues tolerate more supersaturation than "slow" ones, and the allowable ratio decreases with depth.
Workman introduced the concept of the M-value (M for maximum) — the maximum allowable inert gas tension in a given tissue at a given depth at which DCS symptoms should not yet occur. The M-value determines the depth at which the diver must stop so that tissue gas tension can decrease. This depth is called the decompression ceiling.
The most significant work was that of the Swiss professor Albert Bühlmann, published in 1983 in the book "Decompression — Decompression Sickness". Unlike Workman, who related M-values to hydrostatic pressure (depth), Bühlmann based them on absolute pressure. He presented the ZH-L12 (1983) and ZH-L16 (1990) algorithms. The Bühlmann algorithm is the basis of most dive computers and planning programs.
ZH-L16 tissue group half-times
| Group | Nitrogen, min | Helium, min | Group | Nitrogen, min | Helium, min |
|---|---|---|---|---|---|
| 1 | 4.0 | 1.5 | 9 | 109.0 | 41.1 |
| 2 | 8.0 | 3.0 | 10 | 146.0 | 55.1 |
| 3 | 12.5 | 4.7 | 11 | 187.0 | 70.6 |
| 4 | 18.5 | 7.0 | 12 | 239.0 | 90.2 |
| 5 | 27.0 | 10.2 | 13 | 305.0 | 115.1 |
| 6 | 38.3 | 14.5 | 14 | 390.0 | 147.2 |
| 7 | 54.3 | 20.5 | 15 | 498.0 | 187.9 |
| 8 | 77.0 | 29.1 | 16 | 635.0 | 239.6 |
Testing showed that the theoretical M-values for the "middle" tissues were not conservative enough, so ZH-L16 was refined into versions B (for producing tables) and C (more conservative, for dive computers).
Deep stops and bubble models
Practice showed that the Bühlmann algorithm is not perfect either: not every diver who decompressed on Bühlmann tables surfaced without signs of DCS.
The Pyle method
Marine biologist Richard Pyle from Hawaii regularly dived below 60 m and periodically experienced DCS symptoms while decompressing on Bühlmann tables. He noticed that he had no symptoms when he brought fish back with him: to keep them alive, he stopped on the way up and released gas from their swim bladders with a needle — in other words, he made short stops deeper than the first decompression stop.
Pyle proposed a deep-stop rule: the first stop of 1–2 minutes is made halfway between the maximum depth and the first Bühlmann stop; the next one halfway between that stop and the first Bühlmann stop, and so on. If the distance to the first mandatory stop is less than 10 m, no additional deep stops are made.
The mechanism of deep stops was explained by dual-phase (bubble) models, which consider both dissolved gas and gas in the form of microbubbles.
The Varying Permeability Model (VPM)
VPM was developed by David Yount. The model assumes that tissues always contain gas "nuclei" — microbubbles from which bubbles grow during decompression. Under compression the nuclei shrink, and during decompression they do not fully regain their size. According to VPM there is a critical volume of free gas that the body can eliminate through the lungs without DCS symptoms; the goal of decompression is not to exceed it. VPM's first stops are deeper than Bühlmann's, and there are more deep stops than with the Pyle method.
Variants of the model include VPM-B; VPM-B/E — with extra conservatism for long decompressions; and VPM-B/GFS — a hybrid in which the shallow stops are calculated with Bühlmann and a gradient factor.
In 2011 a US Navy study (NEDU, Doolette et al.) compared two profiles with the same total decompression time: one with deep stops and one with traditional shallow stops. DCS occurred significantly more often with the deep-stop profile. The explanation: during deep stops the "slow" tissues continue to take up gas and then need more time at the shallow stops. Later work confirmed this conclusion. Excessive deep stops are therefore no longer used, and when using gradient factors a very low GF Low is avoided.
Ratio Deco (decompression "on the fly")
Ratio Deco is a heuristic method for estimating decompression underwater. The principle: moving from deep stops to shallower ones, the time spent on each segment (group of stops) is twice as long as on the previous, deeper segment.
Example: two stops 3 m apart on each segment.
- Segment 1 (deepest) — 2 minutes in total: one minute at each stop.
- Segment 2 — 4 minutes: 2 minutes per stop.
- Segment 3 — 8 minutes: 4 minutes per stop.
- Segment 4 — 16 minutes: 8 minutes per stop.
- Segment 5 — by the rule, 32 minutes over two stops; but if only one stop (3 m) remains before the surface, a single 16-minute stop is made to keep the shape of the schedule.
Each standard decompression gas usually covers about five stops at an average ppO₂ of about 1.2 ATA; oxygen covers about half as many stops at a ppO₂ of about 1.6 ATA.
Example for a 120 m dive. Decompression starts much deeper than with Bühlmann at a high gradient factor:
| Gas | Depths, m | Stops | Segment time |
|---|---|---|---|
| Tx 12/60 | 90–75 | 6 | 5 min |
| Tx 15/55 | 72–60 | 5 | 10 min |
| Tx 21/35 | 57–39 | 7 | 20 min |
| Tx 35/30 | 36–24 | 5 | 40 min |
| EAN50 | 21–9 | 5 | 80 min |
| Oxygen | 6–0 | stop at 6 m + slow ascent | 80 min |
The ratios: time on oxygen equals time on EAN50; time on EAN50 is twice the time on the gas from 36 m; time on the gas from 36 m is twice the time on the gas from 57 m, and so on.
To build the plan, first determine the time on oxygen from the depth and bottom time, then the times for the deeper segments:
| Dive depth | Time on oxygen |
|---|---|
| 45 m | 0.5 × bottom time |
| 66 m | 1.0 × bottom time |
| 81 m | 1.2 × bottom time |
| 90 m | 1.5 × bottom time |
| 105 m | 2.2 × bottom time |
| 120 m | 3.0 × bottom time |
Example: a dive to 65 m with 20 minutes of bottom time. Time on oxygen — 20 minutes (factor 1.0). The 21–9 m segment on EAN50 — 20 minutes, the 36–24 m segment — 10 minutes, the segment deeper than 36 m — 5 minutes. For a 65 m dive the first stop is at 51 m, so the deep segment includes five stops from 51 to 39 m. With the stops evenly distributed:
| Depth, m | Stop, min | Run time, min |
|---|---|---|
| 65 (bottom) | 20 | 20 |
| 51 / 48 / 45 / 42 / 39 | 1 each | 25 |
| 36 / 33 / 30 / 27 / 24 | 2 each | 35 |
| 21 / 18 / 15 / 12 / 9 | 4 each | 55 |
| 6 | 20 | 75 |
Ratio Deco is a heuristic, not a validated decompression model. It is used to understand the structure of decompression and as a back-up if instruments fail. Any plan made with Ratio Deco must be checked in planning software.
Gradient Factors
Gradient factors are a modification of the Bühlmann algorithm that allows conservatism to be adjusted. Two concepts are needed to understand them:
- M-value — the maximum allowable inert gas tension in a tissue at a given depth (per Bühlmann);
- ambient pressure line — tissue gas tension equals ambient pressure; on this line the tissue neither takes up nor releases gas.
A gradient factor shows what fraction (in percent) of the distance between the ambient pressure line and the M-value may be used. It is written as GF 20/80. The first number is GF Low, the second GF High.
- GF Low 20 — the first stop is made where the supersaturation of the "leading" tissue reaches 20% of what Bühlmann allows.
- GF High 80 — the computer will not let the diver surface until the gas tension in all tissues is below 80% of the M-value, leaving a 20% margin to the critical value.
- Between the first stop and the surface, the allowable supersaturation changes linearly — from GF Low to GF High.
The advantage of gradient factors is flexible control of conservatism:
- GF 100/100 — the pure Bühlmann algorithm: ascending "on the M-values", with no margin.
- GF 0/0 — decompression time tends to infinity.
- The lower the GF Low, the deeper the first stop. This reduces the load on "fast" tissues, but "slow" tissues keep taking up gas meanwhile and will need more time at the shallow stops. In the light of the deep-stop research, a very low GF Low is not chosen.
- The lower the GF High, the longer the computer keeps the diver at the shallow stops; GF High is comparable to the familiar "conservatism level".
Most modern technical dive computers use the Bühlmann algorithm with gradient factors. Factory settings vary between manufacturers; agree the specific GF values with your instructor and the standards of your course.
Haldane introduced half-times and allowable supersaturation, Workman M-values, Bühlmann the ZH-L16 algorithm used in most computers. According to current data, deep stops with the same total time do not reduce but increase the risk of DCS. Ratio Deco is a heuristic that must be checked with software. Gradient factors let you adjust the conservatism of the Bühlmann algorithm.
Knowledge check
10 questions
Gas Selection
Bottom and decompression mixes, MOD, END, gas consumption.
A typical technical dive cannot be ended by surfacing at any moment: decompression obligations or an overhead environment stand in the way. A technical dive therefore does not end "when the gas runs low" or when the diver feels like it — gas reserves are calculated in advance for the whole way back, the ascent, every stop required by the chosen decompression model, and a reserve for team members.
Underwater conditions are rarely ideal, and sometimes you have to deviate from the plan. For this you prepare a contingency plan — for example, for a depth 3 m greater and a bottom time 2 minutes longer (see the TECH-2 chapter for details). The contingency plan is used only if the dive cannot be completed according to the main plan. Both plans are briefed to every team member and, once agreed, followed: goals and bottom time are not changed underwater without an absolute need.
Dive goals and conditions
Planning starts with goals: which tasks will be done, which depths reached, how long it will take, what conditions are expected and who in the team is responsible for what.
When studying the dive site, analyse hazards and complicating factors. In open water these are currents, visibility, water temperature and boat traffic; with poor visibility and strong current — the risk of snagging on obstacles. The same data is needed to choose gases, calculate their volumes, select equipment and organise teamwork. Safety always takes priority over all other dive goals.
The goals must match the divers' training. The level of a team is set by its least experienced member. If a goal requires higher qualifications, it is simplified.
Choosing the bottom mix
The bottom mix is the gas breathed in the deepest part of the dive. It is also used on the descent (or its last segment), at the start of the ascent and sometimes for part of the decompression. The points of switching to and from the bottom mix are set during planning.
To choose the gas you need information about the conditions: depth, water temperature at the surface and at the bottom, thermocline depth, visibility, currents and total dive time.
Equivalent narcotic depth (END)
One of the main criteria for choosing a bottom mix is its narcotic potency. END is the depth at which air has the same narcotic effect as the given mix at the dive depth.
In IDU, when calculating END, oxygen is treated as a narcotic gas on a par with nitrogen. According to the Meyer–Overton theory oxygen is even more narcotic than nitrogen, but part of it is metabolised by the body, so for simplicity their narcotic potency is taken as equal. Helium remains the non-narcotic component of the mix.
END = (P × (FO₂ + FN₂) − 1) × 10 P — absolute pressure at the dive depth, ata
The narcotic part of the mix must not exert more pressure than air at the END depth: 4 ata for END 30 m, 5 ata for END 40 m.
END 30 m — difficult conditions: cold water, poor visibility, current, overhead environment.
Exception: where necessary and in favourable dive conditions, the IDU standard allows the END to be briefly increased to 45 m. So at the TECH-1 level (to 45 m), air and nitrox dives deeper than 40 m are possible only briefly and only in favourable conditions; regular dives to 40–50 m require the TECH-1 Trimix course.
Oxygen partial pressure
For the bottom phase, mixes with a ppO₂ not above 1.4 ata are used. In difficult conditions — cold water, poor visibility, current, overhead environment, long exposure — both the risk of CNS oxygen toxicity and narcosis increase. In that case ppO₂ is reduced to 1.3 ata. For decompression mixes a ppO₂ of up to 1.6 ata is allowed.
Calculation procedure
Inert gases determine the length of decompression, so the bottom mix should contain as much oxygen as possible within the chosen ppO₂.
1) FO₂ = ppO₂ / P — round down 2) Allowed fraction of narcotic gases: FO₂ + FN₂ ≤ P(END) / P 3) FHe = 1 − (FO₂ + FN₂) — round up 4) Check the END and ppO₂ of the resulting mix
Example 1. 40 m, normal conditions: ppO₂ 1.4 ata, END 40 m.
P = 40/10 + 1 = 5 ata FO₂ = 1.4 / 5 = 0.28 → 28 % FO₂ + FN₂ ≤ 5 / 5 = 1.0 → no helium needed Mix: EAN28, END = (5 × 1.0 − 1) × 10 = 40 m
Example 2. 50 m, normal conditions: ppO₂ 1.4 ata, END 40 m.
P = 50/10 + 1 = 6 ata FO₂ = 1.4 / 6 = 0.233 → 23 % FO₂ + FN₂ ≤ 5 / 6 = 0.833 → FHe ≥ 16.7 % → 17 % FN₂ = 100 − 23 − 17 = 60 % Mix: Tx 23/17, ppO₂ = 1.38 ata, END = (6 × 0.83 − 1) × 10 ≈ 40 m
A mix with the highest possible oxygen fraction for a given depth is called the best mix.
Example 3. Difficult conditions: ppO₂ 1.3 ata, END 30 m.
40 m: FO₂ = 1.3 / 5 = 0.26 → 26 %; FO₂ + FN₂ ≤ 4 / 5 = 0.80 → FHe = 20 % → Tx 26/20 50 m: FO₂ = 1.3 / 6 = 0.216 → 21 %; FO₂ + FN₂ ≤ 4 / 6 = 0.667 → FHe = 34 % → Tx 21/34
In practice the standard mix Tx 21/35 (END ≈ 29 m) is often used for 50 m — it suits both difficult and comfortable conditions.
Choosing the decompression mix
A decompression mix contains less inert gas than the bottom mix and speeds up its elimination from the body. It is carried in stage cylinders. The more oxygen in the mix, the more efficient the decompression. The most common decompression gases are EAN50, EAN80 and 100 % oxygen.
Maximum operating depth (MOD) of a mix:
MOD = (ppO₂ / FO₂ − 1) × 10 EAN50: (1.6 / 0.5 − 1) × 10 = 22 m EAN80: (1.6 / 0.8 − 1) × 10 = 10 m O₂ 100 %: (1.6 / 1.0 − 1) × 10 = 6 m
You switch to a decompression gas at a stop no deeper than the MOD of the mix — usually at 21 m for EAN50 and at 6 m for oxygen. You breathe this gas until the next switch or until surfacing.
Before switching, make sure that the current depth is not greater than the MOD of the mix, your buoyancy is neutral and stable, you are holding the stop depth, and the cylinder and regulator are those of the mix you are switching to. Your buddy confirms the switch.
Gas consumption: SAC
To calculate the required gas volume, every diver must know their consumption rate. It is converted to the surface (to a pressure of 1 ata):
- SAC (Surface Air Consumption) — surface gas consumption in litres per minute; independent of the cylinder and the main value used for planning;
- consumption at depth = SAC × P, L/min, where P is the absolute pressure at depth, ata.
For reference: RMV (Respiratory Minute Volume) is the physiological volume moved through the lungs per minute (tidal volume × respiratory rate).
Consumption depends on workload: the harder you work, the more CO₂ is produced and the faster you breathe. Measurements are therefore taken in three modes:
- light workload — drifting with the current, moving slowly;
- medium workload — swimming at a moderate pace without current;
- heavy workload — swimming against the current or at a fast pace (without current you can brace against an obstacle and fin).
Method. Descend to a constant depth (10 m is convenient) and wait until the cylinder temperature equals the water temperature. Record the cylinder pressure, then perform the exercise for at least 5 minutes while holding the depth. At the end record the time, pressure and depth. Repeat for each mode.
Example. 12 L cylinder, depth 10 m (2 ata), 5 minutes per mode.
| Light | Medium | Heavy | |
|---|---|---|---|
| Pressure start → end | 210 → 195 bar | 190 → 165 bar | 170 → 110 bar |
| Used | 15 bar | 25 bar | 60 bar |
| Volume (× 12 L) | 180 L | 300 L | 720 L |
| Consumption at depth (÷ 5 min) | 36 L/min | 60 L/min | 144 L/min |
| SAC (÷ 2 ata) | 18 L/min | 30 L/min | 72 L/min |
Consumption rises sharply with workload. Underwater conditions change, so do not base the planning of decompression dives on your light-workload consumption.
Consumption varies from day to day and from dive to dive, so it needs to be rechecked periodically. It is the reference value for planning.
Knowledge check
10 questions
Gas Management and Planning
Rule of thirds, minimum gas, cylinder sizing, planning software.
Recreational divers usually plan their gas so that they return to the surface with at least 50 bar in the cylinder. Technical diving takes a different approach: in a critical situation the diver must be able to supply himself with everything he needs, including gas, and solving a problem may take considerable time by dive standards. This is taken into account in gas management.
The rule of thirds
One of the most conservative methods, used in technical diving and in overhead environments:
- the first third — for the descent and moving during the bottom phase;
- the second third — for returning to the ascent point and the ascent;
- the last third — a reserve for emergency procedures.
On a normal dive no more than 2/3 of the gas is used, and one third remains untouched. In difficult conditions (for example, against a current in a cave) the even more conservative rule of quarters is applied.
The turn pressure is the pressure at which the first third of the gas has been used:
210 bar / 3 = 70 bar 210 − 70 = 140 bar — turn pressure (start of the return or ascent)
The minimum gas rule
The second approach is to calculate the minimum gas reserve that will allow you and your buddy, sharing gas, to ascend from the most unfavourable point of the dive to the first gas switch. For this you need to know the SAC of each team member. Every technical diver determines his SAC in advance and knows it well. The whole team is planned using the SAC of the diver with the highest consumption.
Example: the dive plan
A dive to 50 m, bottom time 14 minutes, GF 30/85. Bottom mix — the standard mix for 50 m (END ≈ 29 m, suitable for any conditions): Tx 21/35, decompression gas EAN50 (switch at 21 m). SAC = 18 L/min. Descent: 1 minute for the bubble check and 3 minutes of descent. Ascent rate — 10 m/min.
Plan from the planning software (stop time includes travel to the stop):
| Depth, m | Time, min | Run time, min | Gas |
|---|---|---|---|
| 0 → 50 | 4 | 4 | Tx 21/35 |
| 50 | 14 | 18 | Tx 21/35 |
| 50 → 24 | 3 | 21 | Tx 21/35 |
| 24 | 1 | 22 | Tx 21/35 |
| 21 | 1 | 23 | EAN50 |
| 18 | 1 | 24 | EAN50 |
| 15 | 1 | 25 | EAN50 |
| 12 | 1 | 26 | EAN50 |
| 9 | 3 | 29 | EAN50 |
| 6 | 5 | 34 | EAN50 |
| 3 | 8 | 42 | EAN50 |
| 3 → 0 | 1 | 43 | EAN50 |
The dive is divided into phases: descent, bottom phase, ascent to the first stop, ascent to the gas-switch stop, and ascent from the last stop to the surface.
Minimum bottom-gas reserve
The key safety condition is being able to reach the surface alive and well, including while helping a buddy who is out of gas (OOG). Such a reserve cannot be calculated exactly: your buddy is stressed and his consumption will increase; you are stressed too. The calculation is therefore approximate, but vital. Under stress SAC increases at least twofold — which is why it is useful to know your heavy-workload SAC.
We assume the worst case: the emergency happens in the last minute of the bottom phase, and recognising and solving the problem takes up to 1 minute at the bottom.
V = T × P × (SAC₁ + SAC₂) × 2 T — time, min; P — absolute pressure, ata; × 2 — stress factor
Solving the problem at 50 m: 1 × 6 × (18 + 18) × 2 = 432 L Ascent 50 → 24 m, average depth 37 m (4.7 ata), 3 min: 3 × 4.7 × 36 × 2 = 1015 L Stop at 24 m (3.4 ata), 1 min: 1 × 3.4 × 36 × 2 = 245 L Travel 24 → 21 m, average depth 22.5 m (3.25 ata), rounded up to 1 min: 1 × 3.25 × 36 × 2 = 234 L Minimum bottom-gas reserve: 432 + 1015 + 245 + 234 ≈ 1926 L
The average depth of an ascent segment is half the sum of its start and end depths: (50 + 24) / 2 = 37 m.
Gas for the descent and bottom phase
For simplicity we assume a steady 4-minute descent (including the bubble check), average depth 25 m (3.5 ata):
V = SAC × T × P Descent: 18 × 4 × 3.5 = 252 L Bottom phase: 18 × 14 × 6 = 1512 L Total bottom mix: 1926 + 252 + 1512 = 3690 L
Choosing cylinders
The compressor fills the cylinders to 210 bar. After cooling (the cylinder is 12 °C warmer than the air after filling, the water is 5 °C colder than the air) the pressure in the water will be about 200 bar. The residual pressure in the cylinders must be no less than 15 bar, so we use 200 − 15 = 185 bar for the calculation:
3690 / 185 ≈ 19.9 L — minimum total volume of the twinset
An aluminium twinset of 2 × 11.1 L (S80) or a steel twinset of 2 × 12 L is suitable. If gas is insufficient, shorten the bottom time and recalculate the reserve for the new plan, or take larger cylinders.
Decompression gas
The same method is used for the decompression gas: calculate consumption at each stop and during the ascent, then double the result.
| Depth, m | Time, min | Pressure, ata | Consumption, L |
|---|---|---|---|
| 21 | 1 | 3.1 | 18 × 1 × 3.1 = 55.8 |
| 18 | 1 | 2.8 | 18 × 1 × 2.8 = 50.4 |
| 15 | 1 | 2.5 | 18 × 1 × 2.5 = 45.0 |
| 12 | 1 | 2.2 | 18 × 1 × 2.2 = 39.6 |
| 9 | 3 | 1.9 | 18 × 3 × 1.9 = 102.6 |
| 6 | 5 | 1.6 | 18 × 5 × 1.6 = 144.0 |
| 3 | 8 | 1.3 | 18 × 8 × 1.3 = 187.2 |
| Ascent 21 → 0 | 3 | 2.05 | 18 × 3 × 2.05 = 110.7 |
| Total | 735.3 | ||
735.3 × 2 ≈ 1471 L EAN50
A standard aluminium S80 stage (11.1 L) is suitable for this volume: 11.1 × 185 ≈ 2050 L.
A double reserve of decompression gas allows you to share it with a buddy who has lost his — for example, by handing him the stage once your own decompression obligations are complete. In addition, every diver must have a contingency ascent plan in case decompression gas is lost.
Conclusion for the example: a 2 × 11.1 L (S80) or 2 × 12 L twinset with Tx 21/35 and an S80 stage with EAN50. A second decompression gas (EAN80 or oxygen) can be added, but with these inputs the reduction in decompression time will be small.
Planning software
Dives used to be planned with decompression tables. Today there is a wide choice of planning software that can calculate a dive of any complexity. You will discuss with your instructor during the practical part of the course which program best suits your dives. One convenient free planner is DiveProMe+ (by Alexey Vlasov): it runs in a browser, including offline.
Remember: no existing algorithm gives 100 % protection against DCS. A plan from software is always checked with common sense and a gas-reserve calculation.
Knowledge check
10 questions
Dive Organisation and Teamwork
Organising technical dives, team roles, pre-dive checks.
Technical dives carry an increased risk to life and therefore require clear organisation. Sound planning and teamwork are the foundation of safety in technical diving.
Organising a dive
Organising technical dives includes:
- gathering complete and reliable information about the dive site and the dive goal;
- planning transport for divers and equipment;
- planning the technical setup: shot lines, decompression station, etc.;
- ensuring divers have the necessary equipment, spare equipment and repair kits;
- gas supplies for the dive, emergency reserves and oxygen for first aid at the surface;
- the dive route, time and depth limits;
- assigning tasks to participants;
- organising the support and rescue team;
- checking equipment, gases and emergency action plans.
Teamwork
A tongue-in-cheek rule of technical diving says: "Most operations require three hands." There is a point to the joke: a good buddy and the ability to work as a team are the key to safe dives.
One of the principles of technical diver training is self-sufficiency. It is based on three conditions:
- only I can think for myself;
- only I can breathe for myself;
- only I can swim for myself.
This defines the requirements for a technical diver. A self-sufficient diver:
- handles all of his equipment on his own;
- copes with the dive conditions on his own;
- solves problems with his equipment on his own;
- does not create problems for his buddies.
Self-sufficiency does not mean that the diver dives solo and does not care about his buddies. Often the importance of teamwork is understood only when something goes wrong and the diver himself needs help. Technical diving is a team activity: communication and interaction with buddies, sharing tasks and responsibilities, and assistance in emergencies are the key to a successful dive. That is why every diver must:
- take part in organising and planning the dive;
- understand and accept his role in the team;
- follow all conditions and procedures agreed for the dive;
- have a level of training appropriate to the dive;
- have the necessary equipment, identical or similar to that of the group;
- clearly understand the dive goals and a realistic way to achieve them.
Group composition
The group is formed according to the dive task and the level of the participants. The basic group size is two divers. If there are more participants, the group is divided into pairs and/or trios:
- each pair (trio) has its own task and can complete the dive safely without the others;
- the tasks of the pairs (trios) may differ but are consistent with the overall goal of the group;
- each pair (trio) takes part in the overall dive plan and is ready to help other participants.
Pre-dive check
On your first courses the instructor taught you the pre-dive buddy check. A technical diver carries much more equipment, so this check becomes even more important. Technical divers carry it out themselves, without an instructor, following a set sequence.
The leader of the pair (trio) calls out the items in order aloud; each diver checks his own equipment and reports the result to the buddies:
- Dive plan: is it on the slate or in the wet notes.
- Computers and bottom timers: present, working, configured (gases, GF); report to the buddy.
- Second stages of all regulators. With the valve closed and pressure bled off, it must be impossible to inhale from the second stage — this means the diaphragm and exhaust valve are intact. Then open the valve and take 1–2 breaths.
- All cylinder valves: twinset valves open, decompression cylinder valves closed, regulators pressurised. Check the pressure and tell your buddy where each gas is.
- Hose routing: the long hose is free so it can be donated to a buddy. Deploy it, make sure it is accessible and stow it back.
- Inflator and BCD valves.
- Drysuit inflation and dump valves, inflator hose connection.
- Lights: working, secured; tell your buddy where they are.
- Reels, spools, markers and buoys: present and where they are.
- Other equipment (scooters, photo and video gear): working.
Bubble check
After entering the water, the equipment is checked for gas leaks. This procedure is called the bubble check. Where it is done depends on the conditions:
- From shore in calm conditions — almost at the surface: one buddy submerges slightly, the other inspects his equipment and reports, then they swap.
- From a boat with no or weak current — at about 5 m, to stay clear of the propellers. The buddies hover facing each other and take turns rotating around the vertical axis.
- From a boat with current, when divers may be carried away from the site and a shot line cannot be set, — near the bottom or at the dive object.
Knowledge check
8 questions
Emergencies
Equipment failure, gas loss, omitted decompression.
Emergencies can occur on any dive, and technical diving is no exception. The key feature of technical dives — the impossibility of a direct ascent without stops — places its own demands on the diver's actions in an emergency.
A well-trained diver who follows the rules and procedures keeps the probability of an accident to a minimum. But Murphy's law works in diving: if equipment can fail, sooner or later it will; if gas can be lost, it may happen. A technical diver must be ready for this and know the procedures.
The three main emergencies on a technical dive are:
- equipment failure;
- loss of gas;
- omitted decompression stops.
Equipment failure
If a diver looks after his equipment, services it on time and performs the mandatory pre-dive check, the probability of failure is very small, but not zero. Regulators, inflators and valves have moving parts, so a gas leak or a ruptured O-ring is quite possible.
Such problems are usually solved by shutting off the gas supply to the leak:
- leak on a bottom-gas regulator (at the valve or hose connection) — shut down the corresponding twinset valve and switch to the backup regulator;
- leak on a decompression-gas regulator — breathe by opening the valve to inhale and closing it to exhale (feathering);
- leaking inflator — disconnect the inflator hose and switch to the redundant buoyancy system (second wing bladder or drysuit).
Loss of gas
Gas is lost not only through failure but also through inattention. For example, in a strong current or on a scooter, the water flow presses on the diaphragm of the backup second stage or the stage regulator. If the stage valve was not closed after the in-water check, gas can be partly or completely lost, and this is hard to notice in time.
- Loss of bottom gas when the decompression gas cannot be used at this depth: signal the buddy, switch to his bottom gas (gas-sharing procedure) and begin a joint ascent. At the planned switch depth, change to the decompression gas and complete all stops as planned.
- Loss of decompression gas: signal the buddy and begin a joint ascent, doing the stops on bottom gas according to the contingency plan for loss of deco gas. With proper planning this causes no problems. The buddy can hand over his stage once his own decompression obligations are complete.
We do not consider the simultaneous loss of all gases: the probability of all regulators failing at once is negligible, and if such a situation arises through the divers' fault, their training does not match the dive and they must not do it.
Omitted decompression stops
Stops are most often omitted because of planning errors or insufficient training for a dive of that level. Circumstances can also be the cause — a strong current, loss of buoyancy, equipment failure. If it happens, there are procedures you can follow, but none of them guarantees that DCS will not occur.
Method 1. Oxygen at the surface
The most common method, recommended by most training organisations. After surfacing, the diver breathes 100 % oxygen, avoids physical exertion and drinks non-carbonated fluids (no alcohol or caffeine). A comfortable position is lying down or semi-reclining; if the condition worsens, act as described in the DCS chapter. Contact DAN or a hyperbaric physician and monitor the diver.
Method 2. In-water return (US Navy procedure)
This method is used less often. It is based on the US Navy omitted-decompression procedure developed for air dives — its applicability to trimix and deep dives is limited. Return to the water only if there are no DCS symptoms, the diver feels well, has enough gas and is with a buddy.
- Surfaced from a stop no deeper than 6 m and can return within 1 minute — return to the depth of the omitted stop and extend it by 1 minute.
- Surfaced from a stop no deeper than 6 m but cannot return within 1 minute — return to the depth of the omitted stop and multiply the stop times by 1.5.
- Stops deeper than 6 m were omitted — return to the depth of the omitted stop, complete the stops down to 12 m as scheduled, and multiply the stop times from 12 m and shallower by 1.5.
- Signs of DCS are present — do not return to the water. Breathe 100 % oxygen and evacuate the diver urgently to a hyperbaric chamber.
An examination by a hyperbaric physician is mandatory also for divers who used the first method or returned to the water without symptoms. The absence of symptoms now does not mean they will not appear later.
The only 100 % guaranteed way to avoid DCS is not to dive, but that does not suit us. Prepare thoroughly for your dives, maintain your skills and fitness, practise teamwork and emergency procedures. This is the foundation of safe technical diving.
Knowledge check
8 questions
Final exam TECH-1 / TECH-1 Trimix
An exam on chapters 1–13: 50 questions, including a dive-planning task checked by the instructor. The result is sent to your instructor. The exam is optional — you can skip it and continue to the TECH-2 and TECH-3 chapters.
The exam opens in a new window. If it does not open, allow pop-ups for this site.
TECH-2
TECH-2 gases, isobaric counterdiffusion, decompression mixes and contingency plans.
The previous chapters cover the knowledge and skills needed for technical decompression dives at the IDU TECH-1 (to 45 m) and TECH-1 Trimix (to 50 m) levels. Deeper dives require additional knowledge and skills — they are covered in this chapter and the next.
The IDU TECH-2 level
The IDU TECH-2 Diver course prepares divers for decompression dives to 70 m using trimix with at least 18 % oxygen as the bottom mix. The main requirements of the IDU standard:
- to start training — TECH-1 Diver IDU certification (or equivalent), at least 20 logged TECH-1 level dives with staged decompression on nitrox, at least 10 of them on trimix; minimum age 18;
- bottom-mix ppO₂ no higher than 1.44 ata, decompression mix no higher than 1.6 ata;
- two stage cylinders with decompression mixes, each with a regulator and pressure gauge;
- all mandatory decompression stops are completed.
Bottom mix at the TECH-2 level
The oxygen content of a TECH-2 diver's bottom mix must be at least 18 %. Such mixes are called normoxic: they can be breathed from the surface and during the descent. Mixes with less oxygen — hypoxic — cause hypoxia at the surface and at shallow depths. They are used only from the TECH-3 level, and then the dive is not started on the bottom mix (see the next chapter).
The rules for choosing a mix are described in the chapter "Choosing gas mixes": ppO₂ within limits, oxygen narcotic on a par with nitrogen. The acceptable END depends on the dive conditions:
END 30 m — difficult conditions: cold water, poor visibility, current, overhead environment.
Example 1. 70 m, FO₂ = 18 %, normal conditions, END 40 m.
P = 70/10 + 1 = 8 ata ppO₂ = 0.18 × 8 = 1.44 ata — the TECH-2 standard limit FO₂ + FN₂ ≤ 5 / 8 = 0.625 → FHe ≥ 37.5 % → 38 % FN₂ = 100 − 18 − 38 = 44 % Mix: Tx 18/38, END = (8 × 0.62 − 1) × 10 ≈ 40 m
Example 2. 70 m, FO₂ = 18 %, difficult conditions, END 30 m.
P = 70/10 + 1 = 8 ata ppO₂ = 0.18 × 8 = 1.44 ata — the TECH-2 standard limit FO₂ + FN₂ ≤ 4 / 8 = 0.50 → FHe ≥ 50 % FN₂ = 100 − 18 − 50 = 32 % Mix: Tx 18/50, END = (8 × 0.50 − 1) × 10 = 30 m
This is why 70 m is the limit for normoxic trimix: deeper, the ppO₂ of a mix with 18 % oxygen would exceed 1.44 ata. In difficult conditions, when the bottom-mix ppO₂ is reduced to 1.3 ata, a mix with 18 % oxygen can be used to about 62 m: (1.3 / 0.18 − 1) × 10 ≈ 62 m.
Standard mixes
Many divers use standard mixes and base all their calculations on them:
| Depth, m | Mix | Level |
|---|---|---|
| 0–30 | EAN32 | TECH-1 |
| 30–45 | Tx 21/35 | TECH-1 Trimix / TECH-2 |
| 45–60 | Tx 18/45 | TECH-2 |
| 60–70 | Tx 18/50 | TECH-2 |
| 60–75 | Tx 15/55 | TECH-3 (hypoxic) |
| 75–90 | Tx 12/65 | TECH-3 (hypoxic) |
| 90–110 | Tx 10/70 | TECH-3 (hypoxic) |
The reasons for the popularity of standard mixes are simple. First, at their depths they give an END of no more than 30 m (counting oxygen as narcotic) and an allowed ppO₂ — so they are suitable for difficult conditions too. In normal conditions with END 40 m less helium can be used (as in example 1). Second, they are easy to blend from helium and EAN32, which is widely available in regions with a developed dive industry (with the appropriate qualification, you can blend the mix yourself).
Isobaric counterdiffusion
Isobaric counterdiffusion (ICD) is the opposite-direction diffusion of two inert gases with different rates of penetration through tissue, which increases the total gas tension in the tissue without any change in ambient pressure.
Helium diffuses faster than nitrogen. If on one side of a barrier there is a gas rich in fast helium and on the other a tissue loaded with slow nitrogen (or, conversely, on a gas switch the uptake of one gas outpaces the elimination of the other), the total gas tension in the tissue can exceed ambient pressure. The tissue becomes supersaturated, bubbles may form and DCS may develop.
There are three types of isobaric counterdiffusion in diving:
- Superficial (skin). The diver breathes nitrox while the drysuit is inflated with trimix: helium from the suit penetrates the skin into nitrogen-loaded tissues. Skin DCS may result. That is why a drysuit is never inflated with trimix — air or argon is used instead.
- Deep tissue. Occurs when switching from a "heavy" mix (air, nitrox) after significant loading to a "light" one (trimix, heliox). In practice this is unlikely: such a switch usually happens at the start of the dive (from travel gas to bottom gas), when loading is still small. The most dangerous case is switching to bottom trimix after breathing air as a travel gas for a long time.
- Inner ear. Occurs when switching during decompression from a helium-rich trimix to a nitrogen-rich mix. Nitrogen enters the inner-ear tissues faster than helium leaves them, and the tissues become supersaturated. The result is inner-ear DCS: severe vertigo, nausea, vomiting, disorientation, hearing loss. This is the most dangerous consequence of poor gas selection: the diver becomes partly or fully incapacitated at one of the most demanding phases of the dive.
How to reduce the risk:
- do not drop the helium content sharply on gas switches — on ascent the tissues are already supersaturated; reduce helium gradually;
- keep the ppO₂ at the maximum allowed level during decompression — the oxygen window effect partly offsets the change in inert-gas pressures on gas switches.
No exact algorithms for reducing helium have been developed yet, so these rules are recommendations, not a guarantee.
In a later assessment by the same authors (Mitchell, Doolette, 2015), counterdiffusion after a helium-to-nitrogen switch is possible, but such a switch is unlikely, by itself, to cause inner-ear DCS. The leading role is played by venous bubbles entering the arterial circulation through a patent foramen ovale (PFO) and other right-to-left shunts (see the chapter "Barotrauma and Medical Issues"). That is why IDU technical courses require a certificate confirming the absence of a PFO.
Decompression mixes at the TECH-2 level
When planning TECH-2 dives, the loss of a decompression gas must always be anticipated. Tissue loading and decompression time are such that the diver cannot complete all stops on the bottom mix alone. That is why the standard requires two stage cylinders with decompression gases.
A second decompression gas is also needed for efficiency. A decompression gas works best at the maximum allowed ppO₂: decompression starts earlier and the inert gas in the mix is replaced by oxygen. In addition, we lose a lot of heat underwater. When cold, peripheral circulation decreases to supply the vital organs, and inert gases are eliminated from peripheral tissues less effectively. The longer we stay underwater, the higher the DCS risk.
Principles for choosing the second decompression gas:
- minimum inert gas (ideally none);
- CNS and whole-body (OTU) oxygen toxicity limits are not exceeded.
On open circuit at the TECH-2 level the best choice is usually EAN50 + 100 % oxygen.
With long oxygen decompression this rule may not work. On oxygen at 6 m the ppO₂ is 1.6 ata, and CNS accumulates at about 2.2 % per minute: it takes only about 36 minutes to reach 80 %, not counting the CNS from the descent, bottom phase and previous stops. In that case the last stop is made shallower (if conditions allow), a mix with less oxygen is used (for example, EAN80), or air breaks are taken: periodically switching for a few minutes to a mix with a lower ppO₂. For breaks it is better to use a nitrox with a low oxygen content or a mix with little helium, so as not to provoke isobaric counterdiffusion.
With two decompression gases the risk of a gas-switch error increases. Breathing the wrong mix can cause CNS oxygen toxicity and the diver's death. Always complete the full gas-switch procedure that you will practise with your instructor.
Minimum gas reserve
- Bottom gas — for the ascent to the switch to the first decompression gas, including a reserve for your buddy in case he loses his bottom mix.
- Decompression gases — so that if either is lost, the remaining one is enough for the whole decompression with the necessary reserve.
The simultaneous loss of both decompression cylinders by a diver and his buddy is not considered — its probability is negligible.
Contingency plans
The main dive plan may be disrupted. At the TECH-2 and TECH-3 levels, exceeding depth or time through inattention is unacceptable — only external factors can be the cause: a sudden down-current or head current, equipment failure, entanglement, losing or breaking the shot line. Contingency plans are made with these factors in mind.
Contingency plan 1: extended bottom time
The first contingency plan covers exceeding the main plan: depth 3 m greater and bottom time 2 minutes longer.
This plan is used only in an emergency, so the rule of thirds or the minimum gas rule is not applied to it. But there must be enough gas taking stress into account: for the extra bottom time SAC is increased by 50 %, and the residual pressure in the cylinders at the surface must be no less than 30 bar.
Contingency plan 2: loss of a decompression gas
- Loss of bottom gas — begin the ascent immediately; proper valve handling on the twinset helps avoid critical losses.
- Loss of travel gas (TECH-3 level) — the bottom-mix reserve can replace it during the ascent.
- Loss of one decompression gas — the other must be enough to complete the decompression.
From the main plan, determine which decompression gas is used the most — that one is assumed lost. The second contingency plan is calculated so that the remaining gas is enough for the whole decompression and at least 30 bar remains in the cylinder. Buddies will help and share gas once their own obligations are complete, but a technical diver plans everything to cope on his own.
Knowledge check
10 questions
TECH-3
Hypoxic and standard mixes, travel gas, team gas sharing and support divers.
The IDU TECH-3 Diver course prepares divers for decompression dives to 100 m using trimix as the bottom mix, including hypoxic trimix. The main requirements of the IDU standard:
- to start training — TECH-2 Diver IDU certification (or equivalent) and at least 20 logged TECH-2 level dives to 45–70 m on trimix with staged decompression on nitrox; minimum age 18;
- bottom-mix ppO₂ no higher than 1.4 ata, decompression mix no higher than 1.6 ata;
- three stage cylinders with regulators and pressure gauges, a sling to carry them, two SMBs (primary and emergency);
- all mandatory decompression stops are completed.
Hypoxic bottom mixes
At 70–100 m the ppO₂ of a mix with 18 % oxygen would exceed the allowed value. That is why TECH-3 bottom mixes contain less than 18 % oxygen — these are hypoxic mixes (standard ones: Tx 15/55, Tx 12/65, Tx 10/70 — see the table in the TECH-2 chapter).
A hypoxic mix cannot be breathed at the surface or at shallow depths — it would cause hypoxia. For each such mix, in addition to the MOD, a minimum operating depth is determined, at which the ppO₂ reaches 0.16 ata:
Minimum depth = (0.16 / FO₂ − 1) × 10 Tx 12/55: (0.16 / 0.12 − 1) × 10 ≈ 3 m Tx 10/70: (0.16 / 0.10 − 1) × 10 = 6 m
END is chosen according to conditions, as at the TECH-2 level: 40 m in normal conditions, 30 m in difficult ones (cold water, poor visibility, current, overhead environment).
Example 1. 100 m (11 ata), normal conditions: ppO₂ 1.4 ata, END 40 m.
FO₂ = 1.4 / 11 = 0.127 → 12 % FO₂ + FN₂ ≤ 5 / 11 = 0.455 → FHe ≥ 54.5 % → 55 % Mix: Tx 12/55, ppO₂ = 1.32 ata, END = (11 × 0.45 − 1) × 10 ≈ 40 m
Example 2. 100 m, difficult conditions: ppO₂ 1.3 ata, END 30 m.
FO₂ = 1.3 / 11 = 0.118 → 11 % FO₂ + FN₂ ≤ 4 / 11 = 0.364 → FHe ≥ 63.6 % → 64 % Mix: Tx 11/64 or the standard Tx 10/70 (ppO₂ 1.1 ata, END 23 m)
A dive on a hypoxic mix is never started from the surface: it starts on a normoxic travel mix, and the diver switches to the bottom mix at depth.
Travel gas
The travel gas has three jobs:
- it allows the dive to start safely — the hypoxic bottom mix cannot be breathed near the surface;
- it saves bottom mix, of which a very large amount would be needed given the minimum reserve for the ascent to the first decompression gas;
- it softens the transition from a helium-rich trimix to decompression nitrox — helium is reduced gradually.
Criteria for choosing a travel gas:
- ppO₂ no higher than 1.6 ata — little time is spent on this mix at the maximum ppO₂, and the elevated ppO₂ helps use the oxygen window effect during decompression;
- END up to 40 m: little time is spent on the travel gas, so such an END is acceptable even in difficult conditions;
- the distance between gas-switch depths is no more than 40 m;
- the helium content must allow helium to be reduced gradually on gas switches;
- the gas volume is calculated in the same way as the decompression gas reserve.
Example. A dive to 100 m, bottom mix Tx 12/55, decompression gases EAN50 (switch at 21 m) and oxygen (6 m). Between the bottom depth and the first decompression gas there are 100 − 21 = 79 m — more than 40 m, so a travel gas with a switch at 60 m is needed. We choose it for 60 m (7 ata) with END 40 m:
FO₂ — at least 18 % (breathable from the surface) and ppO₂ at 60 m no higher than 1.6 ata → 21 % FO₂ + FN₂ ≤ 5 / 7 = 0.714 → FHe ≥ 28.6 % → 30 % Mix: Tx 21/30 ppO₂ at 60 m: 0.21 × 7 = 1.47 ata; END = (7 × 0.70 − 1) × 10 = 39 m MOD at ppO₂ 1.6: (1.6 / 0.21 − 1) × 10 ≈ 66 m Switches: 100 → 60 m (40 m), 60 → 21 m (39 m)
On the descent the diver breathes Tx 21/30 from the surface and switches to the bottom mix at about 60 m; on the ascent he switches back to Tx 21/30 at 60 m, then to EAN50 and oxygen. The standard mix Tx 21/35 (END at 60 m ≈ 36 m) can be used instead of Tx 21/30.
With three stages and the bottom mix the diver has four gases. The risk of a gas-switch error increases, so every stage is labelled (mix and MOD), and a switch is made only by the full procedure with buddy confirmation.
Decompression gases at the TECH-3 level
Decompression after TECH-3 dives is long. Breathing oxygen at 6 m for a long time quickly accumulates CNS (about 2.2 % per minute at ppO₂ 1.6 ata), so EAN80 is often used as the second decompression gas at this level, and CNS and OTU must be calculated at the planning stage. If necessary, breaks are taken on a mix with a lower ppO₂.
Gas reserves are calculated as at the TECH-2 level: the bottom gas must be enough for the ascent to the switch to the travel gas including the buddy; travel and decompression gases — so that if any one is lost, the rest are enough for the whole decompression. Contingency plans follow the rules of the TECH-2 chapter (depth +3 m, time +2 minutes; loss of the most-used gas; at least 30 bar left).
Team gas sharing
On complex technical dives the group often carries an emergency gas reserve. It is divided among the team: one diver carries an extra cylinder of bottom mix, another an extra travel and/or decompression gas. This method is used when support divers cannot be arranged.
Support divers
Support divers back up the main team during the ascent and decompression. They have their own dive plan, coordinated with the main team's plan. Support divers:
- meet the main team at the agreed depth at the agreed time;
- take away cylinders and equipment no longer needed;
- carry an emergency gas reserve (usually everything except bottom mix);
- provide physical and technical assistance to the main team.
In an emergency, support divers may be the main team's only chance of rescue, so they must work clearly and in a coordinated way.
Knowledge check
8 questions
⚠ Access to TECH-2 and TECH-3 chapters
Advanced-level material. Please confirm: